Well it's spring time around here and all the jobs are piling up. I am busy on the best of days with a fully working shoulder but now being as I am not fully recovered, I'm swamped. I have to rely heavily on Jacob's "boy strength" because I have super wimpy "girl strength" right now.
I have tons of pictures on the camera, to be posted here.... but that will have to wait until later. In the last week I've repotted just shy of 50 tomato plants, about 20 pepper too. Last night I got all the baby onion starts outside, along with the pea's I started inside about 2 weeks ago.
Jake and I are in the process of building a shed, our garage has to many wood shop tools in it to hold the hay and straw bales plus all the garden tools. Our straw was kept outside under tarps and so far this year we've caught 5 mice and 2 voles in traps, so that straw needs to move inside. Today is the official raising of the shed. It's a plastic thing, but we wanted to be able to take it with us when we move out to land as a temporary housing for what ever we happen to be working on.
Big Mamma doe is preggers (finally), she is due to kindle any day now. I feel so bad for her because she is obviously pregnant, they say some rabbits you can't tell by looking at them.... well it's not so with Big Mamma. I plan to breed our other doe soon after BM has her babies, that way the cycle of baby bunz is 1 month apart.
The new girls the Sussex's have finally started laying. Only two of them so far, and the egg size is adorably small. The old gals, the red star's laid large to extra large eggs and for the small size of bird they were, it was impressive. The Sussies however are big birds and they lay medium sized eggs. I think they would likely make a nice meat bird too since they seem to have a lot of overall heft to them. We'll find out eventually...
I made rabbit-chicken-bacon sausage the other day. I had one bird left from the Halperns and it needed to get used, so I deboned it and a half a rabbit, plus about 4 strips of bacon (mostly fat) all through the meat grinder. I added tons of spices: onion, pepper, garlic, sage, salt, cayenne and chili pepper and made some lean sausage patties. They are pretty good, a valiant first attempt.
More to come later.... I gotta go raise a shed.
Showing posts with label 2010. Show all posts
Showing posts with label 2010. Show all posts
09 April 2011

21 December 2010
The arrival of rabbits
On Saturday morning, before our second round of coffee, we had rabbits in our rabbitry. The breeder (Brenda) I was in contact with told me she'd be available Saturday morning or else some time late this week to next week. I really wanted to start this project, the sooner the better!
Jake and I opted to take 2 extra bucks for "harvesting" later this winter, in addition to our breeding trio. A breeding trio means 2 does (girls) and 1 buck (boy). This team should provide us with nearly all the meat we and Kai can eat in a year. So we took home 5 rabbits that day. It's been no more challenging than chicken care, and once I get this down the routine will go much smoother. I also plan to switch the rabbits from a pellet diet to a grain/hay diet. A diet change will take months because rabbits have a delicate digestive system and I don't want to upset it by to much change too quickly.
I did hesitate to name them because you don't name your food... however, we will have these guys for 3+ years and I refuse to call them by a number. When it comes time for their death it will be difficult like Quizzie's but no less appreciated. But that's in the future and it can stay there for a while.
Here's the new crew!
Confetti- our baby doe, she won't be ready for breeding until sometime this spring, May probably.
Boy-girl-boy. These three are from the same litter, we are going to keep the girl as part of our breeding trio but her brothers will meet the stew pot in about a month. For now they can be kept in the same cage, because they are too young to mate but boys reach maturity before the girls do so they will have to be moved out soon.

Another shot of Confetti, she is a tri color white-tan-black. She doesn't have many black spots though. She's nice a bit shy but will allow me to pet her. I have to work with her a bit so she's more comfortable being held.

This is Clove, she is Confetti's mom. She wasn't handled much as a young doe so she doesn't like being held. Her nails are stupidly long so I trimmed them today. A few I cut bit too short and they bled, which further reaffirms that I am out to torture her I am sure. See how her but is backed up to the corner of the cage and climbing up it almost? I feel bad for her because she is so scared, but I keep talking calmly to her and petting her so she knows I am not out to harm her.

This is Chestnut, he's a young buck about 6 months old. I think he was a 4H bunny or he was shown a lot because he loves to be petted and he just wants attention. It's rather cute. Ches will come up to the cage door and stand up tall to get noticed. Also he and Kai are best buds, Kai will clean his head and nuzzle him and he just takes it in stride, he'll even give her kisses back. I have a video of them with the cage door shut, but now every time I come in to give food and water he pokes his head out to nuzzle the dog. He is too cute and just look at those ears!

Here's the video of the rabbitry, featuring Kai and Ches.
With any luck I'll breed Clove with Ches this week and we'll have some babies by the end of January! I want to wait until Clove is a bit more settled and not so terrified of me, but that may never happen so all I can shoot for is comfortable.
Jake and I opted to take 2 extra bucks for "harvesting" later this winter, in addition to our breeding trio. A breeding trio means 2 does (girls) and 1 buck (boy). This team should provide us with nearly all the meat we and Kai can eat in a year. So we took home 5 rabbits that day. It's been no more challenging than chicken care, and once I get this down the routine will go much smoother. I also plan to switch the rabbits from a pellet diet to a grain/hay diet. A diet change will take months because rabbits have a delicate digestive system and I don't want to upset it by to much change too quickly.
I did hesitate to name them because you don't name your food... however, we will have these guys for 3+ years and I refuse to call them by a number. When it comes time for their death it will be difficult like Quizzie's but no less appreciated. But that's in the future and it can stay there for a while.
Here's the new crew!
Confetti- our baby doe, she won't be ready for breeding until sometime this spring, May probably.
Boy-girl-boy. These three are from the same litter, we are going to keep the girl as part of our breeding trio but her brothers will meet the stew pot in about a month. For now they can be kept in the same cage, because they are too young to mate but boys reach maturity before the girls do so they will have to be moved out soon.

Another shot of Confetti, she is a tri color white-tan-black. She doesn't have many black spots though. She's nice a bit shy but will allow me to pet her. I have to work with her a bit so she's more comfortable being held.

This is Clove, she is Confetti's mom. She wasn't handled much as a young doe so she doesn't like being held. Her nails are stupidly long so I trimmed them today. A few I cut bit too short and they bled, which further reaffirms that I am out to torture her I am sure. See how her but is backed up to the corner of the cage and climbing up it almost? I feel bad for her because she is so scared, but I keep talking calmly to her and petting her so she knows I am not out to harm her.

This is Chestnut, he's a young buck about 6 months old. I think he was a 4H bunny or he was shown a lot because he loves to be petted and he just wants attention. It's rather cute. Ches will come up to the cage door and stand up tall to get noticed. Also he and Kai are best buds, Kai will clean his head and nuzzle him and he just takes it in stride, he'll even give her kisses back. I have a video of them with the cage door shut, but now every time I come in to give food and water he pokes his head out to nuzzle the dog. He is too cute and just look at those ears!

Here's the video of the rabbitry, featuring Kai and Ches.
With any luck I'll breed Clove with Ches this week and we'll have some babies by the end of January! I want to wait until Clove is a bit more settled and not so terrified of me, but that may never happen so all I can shoot for is comfortable.
17 December 2010
Holiday Spirit
It's taken me about a week to write this post, simply because I had to come up with the right words.
Last Saturday my door bell rang, a woman about my size with long wavy brown slightly graying hair stood at my doorstep. She had a snowman print gift bag with red tissue coming out the top. I thought, "oh she's got the wrong house.." I learned her name was Susan, and she knew she was a stranger but she just had to thank me. I was puzzled at this point because... thank me? For what? Susan wanted to thank me for the joy the front garden gave her, how happy she was every time she walked by. Our conversation was brief, she said it was all explained in a letter inside her gift bag. I hugged her, wished her Merry Christmas and went inside.
I'll include the letter in it's entirety behind this cut, since it's about a full typed page and I don't want it to take up my whole blog page.
Last Saturday my door bell rang, a woman about my size with long wavy brown slightly graying hair stood at my doorstep. She had a snowman print gift bag with red tissue coming out the top. I thought, "oh she's got the wrong house.." I learned her name was Susan, and she knew she was a stranger but she just had to thank me. I was puzzled at this point because... thank me? For what? Susan wanted to thank me for the joy the front garden gave her, how happy she was every time she walked by. Our conversation was brief, she said it was all explained in a letter inside her gift bag. I hugged her, wished her Merry Christmas and went inside.
I'll include the letter in it's entirety behind this cut, since it's about a full typed page and I don't want it to take up my whole blog page.
10 December 2010
Red Bees and Red Honey
I got sent this article from a friend and thought it was kinda mind boggling. Apparently in Red Hook (Brooklyn) beekeepers are finding RED honey. Like maraschino cherry red! What struck me as funny are the beekeepers, they cannot see why a bee would go and eat such a thing. There is a maraschino cherry factory within range of flight for the bees. Bee's are opportunistic, whatever is easiest and calorie dense they will go to it... red dye and all.

The beekeepers make it sound like, how could they? or don't they know it's junk food? Of course not! If humans lived "hive-minded" and without grocery store's like bee's do, we wouldn't hesitate at a bright red sugar flowing river of calories, we would dive right in! It sucks though for the honey production because apparently it tastes like cough medicine, syrupy and too sweet.
At the end of the article one of the beekeepers makes mention of the color of the bees returning with this red syrup inside them. "When the sun is a bit down, they glow red in the evenings," he said. "They were slightly fluorescent. And it was beautiful."
The Mystery of the Red Bees of Red Hook article at The New York Times.
picture is also from the article.

The beekeepers make it sound like, how could they? or don't they know it's junk food? Of course not! If humans lived "hive-minded" and without grocery store's like bee's do, we wouldn't hesitate at a bright red sugar flowing river of calories, we would dive right in! It sucks though for the honey production because apparently it tastes like cough medicine, syrupy and too sweet.
At the end of the article one of the beekeepers makes mention of the color of the bees returning with this red syrup inside them. "When the sun is a bit down, they glow red in the evenings," he said. "They were slightly fluorescent. And it was beautiful."
The Mystery of the Red Bees of Red Hook article at The New York Times.
picture is also from the article.
09 December 2010
Winter Bee Update
Well so far our girls have held up against the cold. Before winter started we had a good 60,000 strong hive. By the time spring comes we'll be down to around 20,000 (if they make it to spring). A lot of bees die in the winter! Since bee's don't fly when it's below 45-50* outside, all those dead bees pile up inside the hive. Jacob took a coat hanger and bent it into a make shift 'J' shape and used it to pull all the dead bees from the bottom screen of the hive.
This is what he got out.


This is a one gallon Folgers coffee container, now keep in mind this. A pint sized canning jar only 1 inch filled with dead bees is roughly 100 bees. How many do you think is in that red can?
We're guessing somewhere around 10,000. Yikes. Since this is our first year beekeeping, we don't have a reference. Is this normal? No clue, trial by fire.
In other bee news, I made some bee patties today. This is extra food as a "just incase" they don't have enough honey.
For one patty the recipe is:
2 c. Drivert Sugar or Bakers sugar the names are interchangeable (white sugar will do, but drivert is closer to honey chemically... so they say?)
1/2 c. honey (melted so it's runny... it incorporates with the sugar better)
2 T. Mega Bee or other pollen substitute (bee's need protein too... not just sugar)
5-7 drops of peppermint oil (this helps with winter trachea mites)
Jacob put two of these patties on the bees on November 27th. He checked the bees today because the weather is warmer and less likely to shock the hive. They have plenty of patty left and seem to be doing well.
I store the patties in a long container with Drivert sugar inside it. The patties are really sticky so I store them in the sugar. This way sugar will stick to the patty and help dry it out and harden it up so it's easier to handle. When the patties are fresh they are like wet sticky play-dough. After about 1-2 weeks in the sugar they firm up and look like sugar frisbees.

With luck we'll be able to pull them through the winter and expand our hive to two. We also need to find someone willing to let us put a hive on there land. I would love it if we could get someone in town, since bee's do better in city (more variety and all.)
This is what he got out.


This is a one gallon Folgers coffee container, now keep in mind this. A pint sized canning jar only 1 inch filled with dead bees is roughly 100 bees. How many do you think is in that red can?
We're guessing somewhere around 10,000. Yikes. Since this is our first year beekeeping, we don't have a reference. Is this normal? No clue, trial by fire.
In other bee news, I made some bee patties today. This is extra food as a "just incase" they don't have enough honey.
For one patty the recipe is:
2 c. Drivert Sugar or Bakers sugar the names are interchangeable (white sugar will do, but drivert is closer to honey chemically... so they say?)
1/2 c. honey (melted so it's runny... it incorporates with the sugar better)
2 T. Mega Bee or other pollen substitute (bee's need protein too... not just sugar)
5-7 drops of peppermint oil (this helps with winter trachea mites)
Jacob put two of these patties on the bees on November 27th. He checked the bees today because the weather is warmer and less likely to shock the hive. They have plenty of patty left and seem to be doing well.
I store the patties in a long container with Drivert sugar inside it. The patties are really sticky so I store them in the sugar. This way sugar will stick to the patty and help dry it out and harden it up so it's easier to handle. When the patties are fresh they are like wet sticky play-dough. After about 1-2 weeks in the sugar they firm up and look like sugar frisbees.

With luck we'll be able to pull them through the winter and expand our hive to two. We also need to find someone willing to let us put a hive on there land. I would love it if we could get someone in town, since bee's do better in city (more variety and all.)
07 December 2010
Turkey Day Recipes
I wanted to get some of these documented so next year I didn't loose them to bookmark oblivion. Some of them are family recipes and the measurements are all fudged. I've been working on this post for a few days now, mostly because I'm lazy.... Here we go!
Pumpkin Pie
1.5 c. pumpkin pure`
1/2 c. sugar
1/4 c. brown sugar
2 Tbl. AP flour
pinch salt
1.5 tsp. cinnamon
1/2 tsp. ginger
1/4 tsp. nutmeg
1/4 tsp. cloves
2 eggs
3/4 c. heavy cream
1/4 c. milk
oven: 450* then 350*
Mix Dry's, Mix wets. Add dry's to wet's mix until smooth. Add mixture to pie crust, bake 15 minutes. Reduce heat to 350* bake additional 40-45 minutes until a knife in center comes clean.
Whipped Cream
1 c. heavy cream
3 Tbl. sugar
1 tsp. vanilla extract
Beat cream for 30 seconds then add sugar & vanilla. Continue beating until stiff peaks form.
Turkey Brine
2 1/4 c. salt
1 c. sugar
1 Tbl. molasses
8 c. water
5+ garlic cloves, crushed or 3-4 Tbl. garlic granules
3 bay leaves
3 Tbl. poultry seasoning
1 Tbl. peppercorns
2 Tbl. sage
pinch of rosemary leaves
pinch of celery leaves
Bring all ingredients to a boil. Remove from heat, cover and let cool. Place turkey in a large but tight fitting pot, cover with brine. Add water to cover entire turkey. Refrigerate for up to 48 hours before turkey day.
Brine removal tips:
On t-day, remove turkey from brine rinse thoroughly. Dump brine container and fill with cool water. Place the turkey in the cool water for 15 minutes to purge excess salt. Then continue to cook in what ever method. I roasted 325* oven for around 3 hours.
Stuffing or Dressing
2 loaves of bread torn to pieces and dried
2-3 c. celery
2-3 c. onion
1 c. butter
1+ quart of stock (vegetable, turkey etc..)
salt
pepper
poultry seasoning
sage
Mix butter, seasonings, celery and onion. Pour mixture over dried bread crumbs and mix in. Add stock as needed to soften the bread. Cook 320* oven for 2 hours stirring every 30 minutes and adding stock and seasonings as needed).
Pumpkin Pie
1.5 c. pumpkin pure`
1/2 c. sugar
1/4 c. brown sugar
2 Tbl. AP flour
pinch salt
1.5 tsp. cinnamon
1/2 tsp. ginger
1/4 tsp. nutmeg
1/4 tsp. cloves
2 eggs
3/4 c. heavy cream
1/4 c. milk
oven: 450* then 350*
Mix Dry's, Mix wets. Add dry's to wet's mix until smooth. Add mixture to pie crust, bake 15 minutes. Reduce heat to 350* bake additional 40-45 minutes until a knife in center comes clean.
Whipped Cream
1 c. heavy cream
3 Tbl. sugar
1 tsp. vanilla extract
Beat cream for 30 seconds then add sugar & vanilla. Continue beating until stiff peaks form.
Turkey Brine
2 1/4 c. salt
1 c. sugar
1 Tbl. molasses
8 c. water
5+ garlic cloves, crushed or 3-4 Tbl. garlic granules
3 bay leaves
3 Tbl. poultry seasoning
1 Tbl. peppercorns
2 Tbl. sage
pinch of rosemary leaves
pinch of celery leaves
Bring all ingredients to a boil. Remove from heat, cover and let cool. Place turkey in a large but tight fitting pot, cover with brine. Add water to cover entire turkey. Refrigerate for up to 48 hours before turkey day.
Brine removal tips:
On t-day, remove turkey from brine rinse thoroughly. Dump brine container and fill with cool water. Place the turkey in the cool water for 15 minutes to purge excess salt. Then continue to cook in what ever method. I roasted 325* oven for around 3 hours.
Stuffing or Dressing
2 loaves of bread torn to pieces and dried
2-3 c. celery
2-3 c. onion
1 c. butter
1+ quart of stock (vegetable, turkey etc..)
salt
pepper
poultry seasoning
sage
Mix butter, seasonings, celery and onion. Pour mixture over dried bread crumbs and mix in. Add stock as needed to soften the bread. Cook 320* oven for 2 hours stirring every 30 minutes and adding stock and seasonings as needed).
29 November 2010
Thankful day
I have been working on evaluating the miles traveled for this meal and I've decided it's impossible. But I can get it down to the bulk items, some of the spices...yeah I'm not going there. So, here's the run down.
Turkey- Rocky Ridge Ranch- Reardan WA to Spokane WA 23.6 mi Spokane to Cheney 17.7 miles. The birds traveled a total of 41.3 miles
Milk- Spokane Family Farms 34 miles from Cheney WA
Cream- Straus Family Creamery 886 miles from Cheney
Bread (for stuffing) made by me from Montana Milling in Great Falls MT. 375 miles
Cranberries- organic from Northern Cali. Probably similar in miles of Straus Cramery so lets just say 886 miles. I need to find a cranberry bog like Mr. H!
Misc. Incalculable's
pepper
salt
poultry seasoning
butter-costco organic (I did't get a chance with this shoulder, to make my own)
Garden Goods (From our garden)
Squash
Potatoes
Onions
Garlic
Celery
Sage
Thyme
I could have reduced the miles traveled of the cream and the milk by getting it raw from our very local country market. And I probably would have if it weren't for the snow and the shoulder stuff. So next year we'll have about 900 miles less on our total. Wheat for bread I struggle with, no one local grows it organically so I am forced to purchase it regionally. I'd say minus the cranberries and cream we did pretty good. The bulk of the meal was kept under 50 miles! Still, room for improvement but a good job overall.
Turkey- Rocky Ridge Ranch- Reardan WA to Spokane WA 23.6 mi Spokane to Cheney 17.7 miles. The birds traveled a total of 41.3 miles
Milk- Spokane Family Farms 34 miles from Cheney WA
Cream- Straus Family Creamery 886 miles from Cheney
Bread (for stuffing) made by me from Montana Milling in Great Falls MT. 375 miles
Cranberries- organic from Northern Cali. Probably similar in miles of Straus Cramery so lets just say 886 miles. I need to find a cranberry bog like Mr. H!
Misc. Incalculable's
pepper
salt
poultry seasoning
butter-costco organic (I did't get a chance with this shoulder, to make my own)
Garden Goods (From our garden)
Squash
Potatoes
Onions
Garlic
Celery
Sage
Thyme
I could have reduced the miles traveled of the cream and the milk by getting it raw from our very local country market. And I probably would have if it weren't for the snow and the shoulder stuff. So next year we'll have about 900 miles less on our total. Wheat for bread I struggle with, no one local grows it organically so I am forced to purchase it regionally. I'd say minus the cranberries and cream we did pretty good. The bulk of the meal was kept under 50 miles! Still, room for improvement but a good job overall.
28 November 2010
Hot Chocolate
My "other mother" Mom-J suggested that I write a post on Hot Cocoa Mix's. She wanted to know if I had any recipe's for making my own mix. Their are a wealth of cocoa mix recipes on the internet and it is so easy to make it would probably make a great homemade gift idea. However I find cocoa mix's way to sweet! So I started making them old fashioned style, which takes about 10 times longer than a mix does. But I find that the best homemade things are worth a little time and effort. So here is my hot cocoa recipe and how I make it. As I said I like mine on the more cocoa less sugar side...

Measure your milk (what ever kind you like to use), these mugs are 12 oz. and just about 3/4 full. I leave room for cocoa, spirits, and marshmallows. I use the mugs I intend the finished product to go into, rather than any exact measurement. Heat the milk to around 140* if you don't have a thermometer that's fine, the finger test works good too, should be around the "pretty warm but still touchable stage." Next we add the cocoa powder. For a 12 oz. cup I use 1.5 Tablespoons of cocoa powder per cup. So since I am making two cups I used 3 Tablespoons of cocoa powder. But I add them one at a time, and I use my little sifter to break up any cocoa clumps. It adds an extra dish and an extra step but it's SO worth it. It prevents the cocoa from clumping up in the milk and making a horrid mess!!

I stop and stir in the cocoa after every tablespoon I add the milk, which will also prevent excessive cocoa clumps. Once the milk and cocoa are thoroughly mixed I add the sugar and spirits. In this case I added 1 Tablespoon of sugar and 1.5 teaspoons (ish*) of Kahlua.

Peppermint Schnapps is another fine addition. Or the spirits can be left out entirely, however I would add a teaspoon or so more sugar if you leave it out.

I always add the marshmallows to the bottom of the cup and pour the cocoa over the top. This melts the mallows and adds some additional sweetness to the slightly bitter hot cocoa.

Once the all the ingredients are added I raise the temperature of the milk to around 160*-170* which is the standard "latte" temperature at most coffee shops. This way the hot cocoa isn't at a gulping temp and will last longer and melt the mallows. But if it's for kids the 140* temp is usually pretty good.
Pour hot cocoa into mugs, sprinkle with cinnamon and enjoy.
Hot Cocoa Recipe
2 3/4 full 12 oz. mugs of milk
3 Tbl. Dark Chocolate Powder
1-2 Tbl. Sugar
1.5 tsp. Kahlua or other spirits
handfull of marshmallows per mug

Measure your milk (what ever kind you like to use), these mugs are 12 oz. and just about 3/4 full. I leave room for cocoa, spirits, and marshmallows. I use the mugs I intend the finished product to go into, rather than any exact measurement. Heat the milk to around 140* if you don't have a thermometer that's fine, the finger test works good too, should be around the "pretty warm but still touchable stage." Next we add the cocoa powder. For a 12 oz. cup I use 1.5 Tablespoons of cocoa powder per cup. So since I am making two cups I used 3 Tablespoons of cocoa powder. But I add them one at a time, and I use my little sifter to break up any cocoa clumps. It adds an extra dish and an extra step but it's SO worth it. It prevents the cocoa from clumping up in the milk and making a horrid mess!!

I stop and stir in the cocoa after every tablespoon I add the milk, which will also prevent excessive cocoa clumps. Once the milk and cocoa are thoroughly mixed I add the sugar and spirits. In this case I added 1 Tablespoon of sugar and 1.5 teaspoons (ish*) of Kahlua.

Peppermint Schnapps is another fine addition. Or the spirits can be left out entirely, however I would add a teaspoon or so more sugar if you leave it out.

I always add the marshmallows to the bottom of the cup and pour the cocoa over the top. This melts the mallows and adds some additional sweetness to the slightly bitter hot cocoa.

Once the all the ingredients are added I raise the temperature of the milk to around 160*-170* which is the standard "latte" temperature at most coffee shops. This way the hot cocoa isn't at a gulping temp and will last longer and melt the mallows. But if it's for kids the 140* temp is usually pretty good.
Pour hot cocoa into mugs, sprinkle with cinnamon and enjoy.
Hot Cocoa Recipe
2 3/4 full 12 oz. mugs of milk
3 Tbl. Dark Chocolate Powder
1-2 Tbl. Sugar
1.5 tsp. Kahlua or other spirits
handfull of marshmallows per mug
27 November 2010
Snow Day

It's been snowing off and on for about 4 days now. Last night was the first time we got really wet snow. Our little electric snow blower has been performing beautifully. A real shoulder saver. I love using things that are body powered but with both Jacob and I having shoulder issues this little snow thrower is a must.
I am working on a blog post about our Thanksgiving and the miles traveled for all the food we consumed. It's kinda fun to see how much of our food was made right here in our county. Not much else is new with me, just healing up and trying to find a comfortable sleeping position. Enjoy the snow if you have any.
17 November 2010
Victorian Farm
I saw this posted over at cold antler farm and got hooked. Jacob and I spent all weekend watching all 36 episodes of the show. The show makes me want land to farm so badly! I wanted to post the show here incase anyone is interested and for me to be able to find it in the future.
Victorian Farm Episode 1:
Victorian Farm Episode 1:
15 November 2010
Left Hand learning

I can finally type now, which is better than doing the left handed hunt and peck version of typing. Still...here's what I've learned so far.
Left handed mouse control isn't easy, neither is writing
Keyboard shortcuts aren't so short with only one hand
Elastic waist pants are a must, buttoning pants is.... difficult
Being dressed is humbling
Don't try and remove stitches in a hot room you will faint
Narcotics make me dizzy
Delegating dinner isn't as fun as making it
I am very thankful for freezing meals ahead of time
Surprisingly people in public bump into me A LOT, it's amazing how invisible this sling is
Laundry can be done one armed, but it takes twice as long
Comedy therapy really does work
I am doing really well and now that I am on the flip side I can't wait to recover. I still have about 3 weeks left to be in the sling before I start Physical Therapy. I should be mostly recovered by mid January. Which leaves me time to garden plan and get some seeds started once February rolls around. I left some turnips, carrots, leeks and beets out in the garden. I kept thinking I would have time to harvest them before surgery but it didn't end up that way. Oh well maybe I'll send Jake out there on the next 'nice' day to play in the mud and harvest stuff.
11 November 2010
Preserve Toothbrush Subscription
I don't know if I ever mentioned our subscription to Preserve for toothbrushes. This is our 2nd round of toothbrushes and I wanted to just document how the whole thing works.
First we were sent toothbrushes, now 3 months later we are sent this package:
Recyclable paper notice & cardboard shipping container, plus two toothbrushes in return labeled packaging.

Now I place my old toothbrushes back into the same packaging the new toothbrushes came out of. I left the heads poking out just to show you, but before I shipped them back I stuffed the heads in and taped it shut.

Drop it in the mail and voila. Cardboard and paper get recycled, the plastic case for the toothbrushes gets sent back with the old ones = no garbage. Pretty cool.
First we were sent toothbrushes, now 3 months later we are sent this package:
Recyclable paper notice & cardboard shipping container, plus two toothbrushes in return labeled packaging.

Now I place my old toothbrushes back into the same packaging the new toothbrushes came out of. I left the heads poking out just to show you, but before I shipped them back I stuffed the heads in and taped it shut.

Drop it in the mail and voila. Cardboard and paper get recycled, the plastic case for the toothbrushes gets sent back with the old ones = no garbage. Pretty cool.
08 November 2010
Made it
I have to type this one handed since my right arm is still in a sling. But I made it, I am on the flip side now. Hellish nausea and reactions to pain meds aside the surgery went well, I had a labral tear (that didn't show up on the MRI) and a very loose shoulder that has now been tightened back into place. 4 weeks in the sling followed by 8+ weeks of physical therapy which means I should be ready for next garden season right on time!
Happy Healing everyone, I'll post more when I can.
Happy Healing everyone, I'll post more when I can.
01 November 2010
Canning List 2010
With the impending shoulder surgery just 2 days away I figured I should get this last bit of documentation up before I forget in my drug induced stupor to get shit done. I should go and count how many jars of each item I have for a truly accurate number but lets be honest here.... I'm lazy and just getting the list was a heroic effort for me. I've been really busy lately getting dinners cooked and frozen, and other such food staples ready and in the freezer. Jacob doesn't cook, with him working full time all the domestic tasks are my 'job' and I love it. The kitchen is my domain, saying goodnight to my knives on wednesday morning will be difficult for me. I don't give up control easily, I have issues, I know. But I should be able to dictate dinner from the sidelines even if it drives me crazy.


Here's the 2010 list of dried, canned, frozen glory!
Dried (not including herbs, culinary or otherwise)
Parsnips
Zucchini
Peaches
Cherries
Apples
Canned
I pretty much used Ball Complete Book of Home Preserving, however most of the recipe's I tweaked to my own liking. If they aren't from Ball, then I've tried to include the link to other's pages. Here we go.....
Apple Pie Filling
Peach Apple Spice Jelly (left over from pie filling made into jelly)
Peach Apple Pie Filling
Cranberry Sauce
VanillaBean Maple Apple Butter
Apple Sauce
Peaches in light syrup
Cherries in light syrup
Summer Solstice preserves (screwed this one up, should be jelly like instead of jello... even the best canners get distracted.)
Gingered Zucchini preserves
Strawberry Jam
Raspberry Jam
Green Tomato Salsa ( tweaked, since recipe states not to can it)
Roasted Everything Salsa
"medium" Zesty Salsa
Ketchup
Peach BBQ Sauce
Hot, Sweat, Sour Sauce
Pickled Hot peppers
Tomato Sauce (unseasoned)
Tomato Juice
Diced Tomatoes
Green Beans
Carrots
Pickles
Balsamic Onions
Jerked Onions
Roasted Garlic Balsamic Jam = awesome!
Beans: Black, great northern, kidney, pinto, garbonzo ( or equivalent from our garden)
Chicken Stock
Frozen
Huckleberries
Strawberries
Rasberries (not many but next year they should produce wildly!)
pesto
Chickens (purchased from Halperns)
Turkeys (soon to be added from Rocky Ridge Ranch)
Celery
Onions
Bread for stuffing
Tortillas
Loaves of 'Plop' bread or otherwise known as no knead bread
Dinners galore from mac n' cheese to chicken tetrazzini
Scones and quick breads
Granola
Parsnips
Zucchini
Peaches
Cherries
Apples
Canned
I pretty much used Ball Complete Book of Home Preserving, however most of the recipe's I tweaked to my own liking. If they aren't from Ball, then I've tried to include the link to other's pages. Here we go.....
Apple Pie Filling
Peach Apple Spice Jelly (left over from pie filling made into jelly)
Peach Apple Pie Filling
Cranberry Sauce
VanillaBean Maple Apple Butter
Apple Sauce
Peaches in light syrup
Cherries in light syrup
Summer Solstice preserves (screwed this one up, should be jelly like instead of jello... even the best canners get distracted.)
Gingered Zucchini preserves
Strawberry Jam
Raspberry Jam
Green Tomato Salsa ( tweaked, since recipe states not to can it)
Roasted Everything Salsa
"medium" Zesty Salsa
Ketchup
Peach BBQ Sauce
Hot, Sweat, Sour Sauce
Pickled Hot peppers
Tomato Sauce (unseasoned)
Tomato Juice
Diced Tomatoes
Green Beans
Carrots
Pickles
Balsamic Onions
Jerked Onions
Roasted Garlic Balsamic Jam = awesome!
Beans: Black, great northern, kidney, pinto, garbonzo ( or equivalent from our garden)
Chicken Stock
Frozen
Huckleberries
Strawberries
Rasberries (not many but next year they should produce wildly!)
pesto
Chickens (purchased from Halperns)
Turkeys (soon to be added from Rocky Ridge Ranch)
Celery
Onions
Bread for stuffing
Tortillas
Loaves of 'Plop' bread or otherwise known as no knead bread
Dinners galore from mac n' cheese to chicken tetrazzini
Scones and quick breads
Granola
25 October 2010
Plant Review: Onions/Garlic
Time for another plant review! Onions and garlic this time, it's the stinky plants review...
Here we go!
Onions
Yellow of Borettana:
A medium sized doughnut shaped onion, mild, but hell when I cut into them. I needed goggles! Many tears were shed over this onion. I left them in the ground too long and the bottom where the roots are will split open and start to kinda rot out. So for next year I will pull them in early-mid July instead of early August. They are not a keeper onion, but will last for some time in the fridge. Mine didn't last that long because they went into the salsa's! I will plant more of these next year.

Yellow Of Parma:
These were my keeper onions, but they didn't do as well as I had hoped. I put the starts in the ground when they were smaller than a pencil and I should have repotted them inside and got them a bit bigger before they went out. Most of mine were the size of my fist, medium to small ish. They have good flavor and seemed to do just fine in my soil. The tops took a while to fall over but when they did I didn't have any rotting issues like I did with the Borettana onion. Sadly I can't seem to find my picture of this onion, but it looked like the average store keeper onion. But it tasted awesome! I don't have many keepers because I used a lot of them in salsa, pasta and bbq sauce, and making onion powder. However I'll plant more of them next year in the hopes that I don't have to buy any from the farmers market.
Evergreen Hardy:
Bunching green onion, just standard. I still have a half row that I need to bring inside in the green onion pot. Did you know if you just cut the green part and stick the white part back in the soil (provided you didn't cut off the roots) it will regrow again and again. I have a pot that I keep in the window all year and when I need green onions I just chop them off at the soil line.

Giant Musselburgh and Blue Soliaze Leek:
I honestly can't tell the difference between these two leeks. Apart from one having slightly blue'er foliage they taste identical, or perhaps I am not much of a leek connoisseur. About half of my leek crop is still outside braving the frosts and the cold. They were surprisingly easy to grow, I did start all my onion family from seed. The leeks seemed to do the best even though they spent much of the summer hidden by the tomato jungle.

Garlic
Inchelium Red:
Softneck, keeper. This is the bulk of what I have planted and I love it! Not as easy to peel as store bought garlic. The flavor is a good midline not overpowering or hot. Some of the bulbs grew to near onion size! I have saved some of this seed and replanted it for next year's harvest.

Georgian Crystal:
Hardneck, Large cloves only 4 per garlic bulb, mild also good raw. This guy is a dream to peel the cloves practically jump out of the skin. Good soft flavor if you need some garlic in a dish you don't plan to cook. I saved some seed to have more of them, but the bulk of this crop was given away as gifts.
Asian Tempest:
Hardneck, Purple striped, HOT! I used much of this in salsa and gift giving. It adds great garlic flavor and makes some of the best spicy hummus. I have this growing in the ground now for next year. I really enjoyed this garlic.
Georgian Crystal and Asian Tempest bundles:

22 October 2010
Rabbitry Decision
We are going for it.
After long thought about producing our own meat we've decided to start raising rabbits. Being in the city limits us to an animal that makes little to no noise. Since chickens preach to the choir, often at full volume they are not an option. Also we didn't want any one else to take a hand in our own supply of food.
We've purchased 5 cages and Jacob is designing the rabbit hutch in sketch-up. I'll post pictures as this project unfolds.
My mom told me today that my great grandmother couldn't stomach raising rabbits because when the fur came off they resembled cats too much. I disagree, I had to skin a cat for Anatomy at Vet school. ( that was fun.... <--- insert sarcasm )
After long thought about producing our own meat we've decided to start raising rabbits. Being in the city limits us to an animal that makes little to no noise. Since chickens preach to the choir, often at full volume they are not an option. Also we didn't want any one else to take a hand in our own supply of food.
We've purchased 5 cages and Jacob is designing the rabbit hutch in sketch-up. I'll post pictures as this project unfolds.
My mom told me today that my great grandmother couldn't stomach raising rabbits because when the fur came off they resembled cats too much. I disagree, I had to skin a cat for Anatomy at Vet school. ( that was fun.... <--- insert sarcasm )
14 October 2010
Plant Review: Tomato
This is going to be a long entry. If you've seen the garden list page ---> you'll know that I grew 7 tomatoes this year. I've gotta get this review written before I forget how I liked each variety. Here we go...
Long Keeper:
Small fist sized tomatoes that are uniformly round, they look like shinny green apples on the plant. They don't ripen well on the plant, they must be pulled inside to slowly ripen. If we had a normal fall we would have just pulled them off the plant. Since we didn't they've been inside about 3 weeks before we were anticipating. Regardless they look great and are just now turning colors. We should have fresh tomatoes through mid November. They ripen to a soft pink color and have good but mild flavor. I'll grow it again but only 1 plant not 5. I still am not sure what to do with them all!


Italian Heirloom:
Gianormous tomatoes! 1+ pounds each! Great slicer and heavy producer. This one was the easiest from seed to start. I had so many starts I put tomatoes in spots I never intended because I didn't have the heart to toss them. The vines grew to 6 feet and were so weighed down Jake and I had to add extra twine supports for them. The fruit was a good juicy slicer, almost bigger than the average hamburger bun, but really I'm not complaining. I'll grow this one again, but not nearly as many, 2-3 probably. The fruit picture shows it compared to a larger roma tomato.


Martino's Roma:
Wow! This guy didn't vine up like the Italian heirloom, it only got off the ground 3 feet. But those 3 feet packed a punch. The plants were loaded, I'd venture a guess at 30+ pounds per plant. We're going to get a butcher style scale next year to be sure. I digress.... The fruit was hidden under the leaves so it was deceiving. We harvested maybe 10 of these ripe on the plant, everything else has had to ripen slowly inside. The flavor is wonderful with very little juice. I've made TONS of tomato sauce. I will be growing these next year. We put in 5 plants I am thinking a few more wouldn't hurt.


Cherry Roma:
If we would've had height these guys would have kept going. They got to 6 feet easily and likely would have made it to 8+. A typical cherry tomato plant but the fruit had little juice in it. They're excellent sun dried because of all the meat on the inside. Prolific as they were we ended up drowning in them. Exceptional flavor raw that got even more intense when dried. I ate them every time I was outside, harvested daily and couldn't keep up. I had 3 of them in the garden and I'll likely only put in 1 or 2 for next year, I haven't decided yet. Fruit picture shows them green, I didn't have any ripe when I took the pictures of them. Like everything else they came inside green and slowly ripened.


Sheboygan:
A paste tomato but much bigger than the standard roma. The vine was thin with fewer leaves than the other varieties. All the fruit seemed so exposed. I love this tomato. Not as productive as the Martino's but the fruit was on average fist sized. The flavor was awesome and slightly sweet. The fruit ripens to a pink hue. Sometimes the fruit had curled bottoms like chili peppers, which was slightly adorable. I only had 4 of these guys and I will make sure I have that or more next year. The bottom fruit picture shows it's color next to a silvery fir tree tomato. I couldn't get the camera to capture the pinkness of the color. The naked eye is no match for a camera.


Silvery Fir Tree:
Another one that was so easy to grow from seed I had to chuck some out. The foliage is similar to carrots only fatter. This one was the first to flower and produce fruit. A tennis ball sized slicer with good flavor and tons of juice. The plants were so heavy loaded they didn't vine up much, very similar to the Martino's Roma. Silvery Fir only came off the ground about 2 feet and then kinda vined outward on the ground. Each plant had at least 25 pounds of fruit on it when we pulled them inside. I had 5 of them. I will grow this one again for it's early yields, but with the Italian heirloom slicer these became too much.


Green Zebra:
I didn't like this guy too much. It was fine when under ripe but got kinda mushy when ripe. The one plant I had didn't produce much either. It vined up nicely but didn't get to the going until too late. This was a trial plant to see if we liked it before growing it in mass. I'm glad we did because I doubt I will grow it again. I don't have a picture of the plant because I forgot, but I have a picture of a ripe fruit. It's sure pretty with those yellowy stripes.

This year was insane! All of our tomato processing was done after they came inside and ripened a while. I'll remember to give them more room next year and I won't plant leeks right next to each tomato plant. Poor things got lost. As much as I love tomatoes I will be really glad when canning/processing is done.
Long Keeper:
Small fist sized tomatoes that are uniformly round, they look like shinny green apples on the plant. They don't ripen well on the plant, they must be pulled inside to slowly ripen. If we had a normal fall we would have just pulled them off the plant. Since we didn't they've been inside about 3 weeks before we were anticipating. Regardless they look great and are just now turning colors. We should have fresh tomatoes through mid November. They ripen to a soft pink color and have good but mild flavor. I'll grow it again but only 1 plant not 5. I still am not sure what to do with them all!


Italian Heirloom:
Gianormous tomatoes! 1+ pounds each! Great slicer and heavy producer. This one was the easiest from seed to start. I had so many starts I put tomatoes in spots I never intended because I didn't have the heart to toss them. The vines grew to 6 feet and were so weighed down Jake and I had to add extra twine supports for them. The fruit was a good juicy slicer, almost bigger than the average hamburger bun, but really I'm not complaining. I'll grow this one again, but not nearly as many, 2-3 probably. The fruit picture shows it compared to a larger roma tomato.


Martino's Roma:
Wow! This guy didn't vine up like the Italian heirloom, it only got off the ground 3 feet. But those 3 feet packed a punch. The plants were loaded, I'd venture a guess at 30+ pounds per plant. We're going to get a butcher style scale next year to be sure. I digress.... The fruit was hidden under the leaves so it was deceiving. We harvested maybe 10 of these ripe on the plant, everything else has had to ripen slowly inside. The flavor is wonderful with very little juice. I've made TONS of tomato sauce. I will be growing these next year. We put in 5 plants I am thinking a few more wouldn't hurt.


Cherry Roma:
If we would've had height these guys would have kept going. They got to 6 feet easily and likely would have made it to 8+. A typical cherry tomato plant but the fruit had little juice in it. They're excellent sun dried because of all the meat on the inside. Prolific as they were we ended up drowning in them. Exceptional flavor raw that got even more intense when dried. I ate them every time I was outside, harvested daily and couldn't keep up. I had 3 of them in the garden and I'll likely only put in 1 or 2 for next year, I haven't decided yet. Fruit picture shows them green, I didn't have any ripe when I took the pictures of them. Like everything else they came inside green and slowly ripened.


Sheboygan:
A paste tomato but much bigger than the standard roma. The vine was thin with fewer leaves than the other varieties. All the fruit seemed so exposed. I love this tomato. Not as productive as the Martino's but the fruit was on average fist sized. The flavor was awesome and slightly sweet. The fruit ripens to a pink hue. Sometimes the fruit had curled bottoms like chili peppers, which was slightly adorable. I only had 4 of these guys and I will make sure I have that or more next year. The bottom fruit picture shows it's color next to a silvery fir tree tomato. I couldn't get the camera to capture the pinkness of the color. The naked eye is no match for a camera.


Silvery Fir Tree:
Another one that was so easy to grow from seed I had to chuck some out. The foliage is similar to carrots only fatter. This one was the first to flower and produce fruit. A tennis ball sized slicer with good flavor and tons of juice. The plants were so heavy loaded they didn't vine up much, very similar to the Martino's Roma. Silvery Fir only came off the ground about 2 feet and then kinda vined outward on the ground. Each plant had at least 25 pounds of fruit on it when we pulled them inside. I had 5 of them. I will grow this one again for it's early yields, but with the Italian heirloom slicer these became too much.


Green Zebra:
I didn't like this guy too much. It was fine when under ripe but got kinda mushy when ripe. The one plant I had didn't produce much either. It vined up nicely but didn't get to the going until too late. This was a trial plant to see if we liked it before growing it in mass. I'm glad we did because I doubt I will grow it again. I don't have a picture of the plant because I forgot, but I have a picture of a ripe fruit. It's sure pretty with those yellowy stripes.

This year was insane! All of our tomato processing was done after they came inside and ripened a while. I'll remember to give them more room next year and I won't plant leeks right next to each tomato plant. Poor things got lost. As much as I love tomatoes I will be really glad when canning/processing is done.
Lip Balm Update
I had to run some tests on the Lip Balm to make sure they were ready for the pocket (body heat melting). It turns out the cocoa recipe is not. It's too soft and needs more beeswax to firm it up. So today I am going to remove it from the tins and re-melt it, adding 1.5 tsp more beeswax and give this a shot. I am going to update the recipe on the previous blog entry and also here:
Cocoa
4 tsp. olive oil
2 1/2 tsp. beeswax (grated)
1 tsp. cocoa butter
1/2 vitamin E capsule liquid
Cocoa
4 tsp. olive oil
2 1/2 tsp. beeswax (grated)
1 tsp. cocoa butter
1/2 vitamin E capsule liquid
13 October 2010
Lip Balm
I wanted to try and make my own lip balm from the bees wax we collected. Honestly it doesn't take much beeswax to do this. Only a few teaspoons. I decided to blend my recipes based on a few I've found online and just kinda wing it.
My Recipes:
Plain
3 tsp. Beeswax (grated)
5 tsp. oil (I used olive oil, but any carrier oil would work)
1/2 tsp. honey
1/2 vitamin E capsule liquid
Cocoa
4 tsp. olive oil
2 1/2 tsp. beeswax (grated)
1 tsp. cocoa butter
1/2 vitamin E capsule liquid
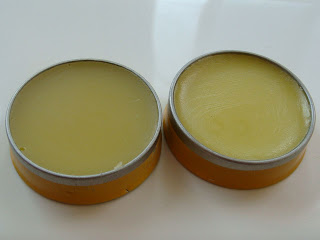
One recipe made 2 burts bees tins. In an effort to recycle I have been saving them. I cleaned and washed each one before refilling it with my own lip balm. Some of the links I used to make them are here: Lemelange and Yonderwayfarm.
I used a 2 cup pyrex and a stainless steel pot to serve as a double boiler. Then I added all the ingredients, stirred it with a tooth pick until it was totally melted and mixed (which doesn't take long.) I had two tins ready and poured the liquid into them and waited about 30 minutes for it all to harden and set up. Voila, Done!
Why have I been paying 2+ dollars per tin? I made the plain recipe once and the cocoa twice, I now have 6 tins of lip balm awaiting the dry winter air.
My Recipes:
Plain
3 tsp. Beeswax (grated)
5 tsp. oil (I used olive oil, but any carrier oil would work)
1/2 tsp. honey
1/2 vitamin E capsule liquid
Cocoa
4 tsp. olive oil
2 1/2 tsp. beeswax (grated)
1 tsp. cocoa butter
1/2 vitamin E capsule liquid

One recipe made 2 burts bees tins. In an effort to recycle I have been saving them. I cleaned and washed each one before refilling it with my own lip balm. Some of the links I used to make them are here: Lemelange and Yonderwayfarm.
I used a 2 cup pyrex and a stainless steel pot to serve as a double boiler. Then I added all the ingredients, stirred it with a tooth pick until it was totally melted and mixed (which doesn't take long.) I had two tins ready and poured the liquid into them and waited about 30 minutes for it all to harden and set up. Voila, Done!
Why have I been paying 2+ dollars per tin? I made the plain recipe once and the cocoa twice, I now have 6 tins of lip balm awaiting the dry winter air.
11 October 2010
It Gets better....
Since today is National Coming Out Day I thought I would give a quick post and a shout out to world. The bullying has got to stop. The suicide's due to the bullying has got to stop! Being a happily married hetero couple, I have no idea what that kind of torment is like. I know first hand the suffering a suicide can inflict on the family left behind. Jacob and family lost his brother John to suicide, not because he was gay but for depression reasons.
I would like to make it known to the world we support you, all of you. I had to post this video of Dan & Terry. Terry is from Spokane WA our neighboring city.... it really makes me sad how he describes it. Plus I just love Dan Savage's point of view.
With love and hope for the future!
I would like to make it known to the world we support you, all of you. I had to post this video of Dan & Terry. Terry is from Spokane WA our neighboring city.... it really makes me sad how he describes it. Plus I just love Dan Savage's point of view.
With love and hope for the future!
Subscribe to:
Posts (Atom)