28 June 2008

Heat and Local foods

Man the heat when it gets up into the 90's it really makes your muscles like liquid. Maybe that's why we have been doing indoor things all afternoon.

This morning however, we went into Spokane to harvest some local foods. First stop was Fresh Abundance. This little gem is new to the Spokane area and stocks TONS of local foods. I found a local grain distributor that I was otherwise unaware of thanks to Fresh Abundance. A local honey producer in Otis Orchards, and a Tofu maker in Newport!  Local, Local, Local that is what we are working towards. To coin a phrase "localatarian" this is what Jacob and I are striving to become.  

We next stopped off at Huckleberry's the long standing natural foods store. Granted they sell mostly organic products, but we are trying to take the petroleum out of our food. Organic bananas, however wonderful they look still come from Argentina! That is ALOT of gas just to get me some bananas. So we are learning to live with what is in season, which is cherries and shortly strawberries. This winter will definitely be a challenge for us, since not much is grown in this region. We'll have to rely on much of what California produces. We are lucky because we live so close to California. If I can't buy local I want to purchase bioregional, which will support not only my state but neighboring states. 

Ok back to the topic on hand, Huckleberry's sells many things we use in bulk. Things like olive oil, braggs amino acids, sesame oil, even some bio-kleen products (which in fact is a cleaning product from Vancouver, WA). We found out that Huckleberry's has organic bulk peanuts, yeah for peanut butter!! 


Next on our harvesting journey was the Spokane Farmers Market. We needed some salad fixings, and baby green onions. We scored some early green beans, and some sheep cheese from Lark Haven Farm they even had the BEST feta I've ever had! But being loaded with feta already I decided we shouldn't purchase any, after I finish off what's in the fridge I'll be getting some into my hot little hands. 


26 June 2008

Trailer Before and After

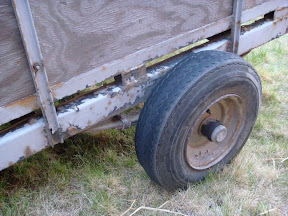
Jacob and I got really sick of filling two huge rubber maid tubs with compost and lifting them into the back of the car. Talk about back breaking and sweating for your garden. We needed a trailer. The hunt on craigslist began! Shortly, as if the universe heard our need we manifested a small trailer.


The modest and very used little guy was being sold for $200, we offered $150 and she took it. The little guy needed new lights, a paint job and some love. All of which we were capable of doing for under $70. Which brings our total up to $220. Now this size and utility style of trailer (assembled) sells for upwards of $400 before tax. We got a steal!


After some careful planning we decided to go with a green or yellow coat of paint. To further our "green" efforts we opted for green in color, ( plus I couldn't find yellow. ) I purchased a rustoleum primer for heavily rusted metal and our chosen green color. I neglected to get a picture of the trailer in it's primed color. Which was a really ugly color of brown/red. Jacob said he was having flash backs of the color of our house BEFORE we painted it... yep green. Do you see a theme with us? I think so.


After the final coat of paint was on this little guy was looking sexy! We decided it was time to sand and stain the boards. But Gerry, a man Jacob works with, had some left over plywood that he was looking to get rid of. We gladly took it on, for one, this wood was not weathered and would hold a stain much better. We decided we would build bird houses out of the old trailer wood, because birds don't care and would much rather have there homes unstained! So cut the wood we did, and stain it too! Slapped them on to the metal and paused in awe, wow we do good work!

The final stage in this beauty was to add the electrical. Jacob decided on using LED lights because they consume less energy and therefor would tax the Prius's batteries less. It took him several hours to run the wiring. Being the perfectionist that he is many zip ties and adjusting was needed to get it just right. But then after some debacle with the car wiring, we were able to test out our trailer.


Working and looking great, the little beauty hauled it's first cubic yard of compost yesterday. It will be hauling more later this after noon as soon as the recycle center is open.

24 June 2008

Dog Treats

I found this recipe while in search of raw dog food ideas and thought it sounded like a good wholesome treat for the little girl. I had to evolve the recipe a little because it seemed way to dry.
Here is the original recipe:

1 1/2 c. ripe mashed banannas
1/2 tsp. vanilla
3 c. oats
1/2 c. chopped peanuts
1/4 c. applesauce

Mix all ingredients, heat oven to 350* make "meatball" sized cookies and lightly flatten with a fork. Bake for 15-17 min.

I didn't have applesauce. But I had 2 (grown in washington) apples, with my food processor I smashed the apples into a slightly chunky applesauce ( I didn't want to get the blender dirty).  I used old fashioned oats and they were a little to dry for the lack of liquid ingredients in this recipe. So I used both apples, it ended up to be about a cup of applesauce. I also didn't have peanuts on hand, but almonds did the trick... after I ran them through the food processor to make them very tiny.

My Recipe:

1 1/2 c. ripe mashed bananas ( 2 bananas)
1/2 tsp. vanilla
3 c. old fashioned oats ( I will make this 2 1/2 c. the next time I make them)
1/4 c. finely chopped almonds
1 c. apples (food processed to slightly chunky, 2 apples)

Bake 350* for 15-17 min


08 June 2008

Monarch Way Station day 1

We started half of the Monarch way station today. We didn't have enough supplies to get it all done. That will come later in the week. 

First before any planing can be done the grass has to be removed/killed. Rather than rent a gas guzzling machine to rip out the grass or using poisons to kill it we opted on smothering. Smothering the grass is really easy and saves on back breaking labor too.  The tools needed are, cardboard, a sprinkler, shovel, soil/compost, or other soil amenities like manure and coffee grounds, tarps (optional).

This is Jacob peeling off the stickers from the cardboard we will be using.


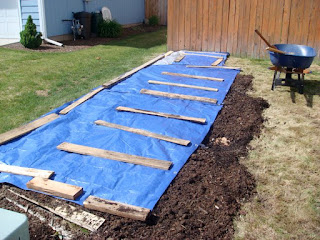
This is the plot we chose, it is the smaller side of our front yard. It measures 15 feet by 30 feet. The minimum for a Monarch Way Station is a 10' by 10' area or 100 square feet. Ours will be larger than the required minimum, yeah for butterfly's and bees!


Jacob is adding our soil amenities, since as previously mentioned the top 2 feet is all rock. We are adding compost, manure, coffee grounds and some garden soil. I'd liked to have added some newspaper or hay but the wind was blowing pretty hard and made adding that impossible. Maybe later...


All done adding stuff! Now we need to tarp it!


Tarps held in place with wood from broken down pallets. this will help the soil "cook" and break down faster thus making a nice garden bed.  We will plant the seeds right on top (after removing the tarp) once we get them ordered. 


Beginning the Monarch Way Station


Today, since it is nice out I am going to plan and measure for the monarch way station. I believe part of our front yard will work wonders for this idea. For more information about starting a Monarch Way Station click here.

First on my to do list is kill all the grass in the area I want to plant. Which shouldn't be a problem, I plan to put down cardboard and soil amenities like compost, newspaper, coffee grounds, and manure. Our top two feet of soil is mostly rock, since not much thrives on rock I have to soil build. 

I am going to get most of my "wildflower" plants from Wildflower Farm.They graciously separate the flowers by state, so you can purchase native plants.   

07 June 2008

Planting Herbs

I didn't do any indoor starts of plants this year. So I am forced to buy some herbs since the ones I planted last year got fried. I had glorious plans for those dried herbs, but a vacation and a miss aimed sprinkler system and too much sun = dead herbs. I thought I would share the planting of Thyme and Stevia.


In the garage with all my supplies including pots, soil, shredded paper (for mulch), gloves and some scissors. I have been waiting for days to plant these two. Mostly because it was too cold and rainy outside to plant. But the weather wouldn't let up and they needed new soil, so planting in the garage it is!

Thyme and Stevia, unsuspecting little guys, never guessing there soil is about to be disrupted!


The thyme came in a peet moss shell, fully recyclable as the shell will break down over time. I decided to help it along and cut it into pieces to be added to the soil mixture.

After I packed it will soil, I added a layer of shredded paper on top for mulch. The paper will keep the plants cool in the summer, and help retain moisture.

Pallet Compost Bin

Earlier this year we decided to make a compost tumbler, which I'll deconstruct and post later. But we realized it won't be enough composting room.  So we've built a compost bin.  We used recycled (free) pallets, nails from breaking down other pallets, some 2" screws  from another project, and 2 hinges, (purchased new).  Everything else was recycled. 

I am not including measurements because pallets come in many different shapes and sizes. Just modify what your doing, make sure it stays up, because really... it just holds compost. 

This Jacob moving the bark and loosing the soil, this will help the worms and other ground insects get into the pile easier. Plus we had to move, our drip line so it wouldn't be crushed.


Sorry but this was to cute not to add. Jacob with the axe.

The first pallet we attached to the fence, using the old screws.
This is a small piece of wood we are using as a support to attach the back pallet with the west side wall. Using pallets is a bit difficult because the structure makes them hard to connect. We could have used heavy gage wire but we didn't have that and didn't want to buy anything we didn't have to.

A second view of  the west wall being fastened to the back wall.


Jacob is screwing in 2" screw into the base of  the west wall, thus attaching the bottom of the west wall to the back wall. 

We opted to add additional support for the side walls. Mainly because we needed to construct a gate (dogs think compost is cool) the gate will prevent our dog from having fun at our compost's expense. This diagonal board gives the side walls of the bin extra support. Plus in Cheney we have strong wind gusts.


The gate. We used a circular saw to cut a pallet in half.  This gate took some figuring out again because of pallet construction we had to add something to hook the gate hinges too. 

Below is a picture of the two small boards we had to add in order to attach the gate hinges.
An arial view of the boards. They each stick out 2.5",  just enough to attach the hinges.

The top hinge.


The bottom hinge.
Jacob is hammering in the extra support board anchoring the back pallet with the east wall. 
We again added a diagonal support board. Just to give each wall some stability. We also anchored the east wall at the bottom to the back pallet (shown on the other side).
Ta Da! The completed pallet compost bin. Not much too it.


With the gate open.