Now on with the story.
The next step of the project was making the vertical 2"x2"s for the sides of the arbor. The design in the book had four vertical boards but Jen and I decided that five looked better. We just leaned the boards up against the cross-braces to see what it looked like first. The vertical boards require measuring from the top of the top cross-brace to the bottom of the bottom cross-brace. Next, I used the miter saw to cut 10 2"x2"s to length. While I did this, I had the thought of putting dowels horizontally through the vertical 2"x2"s. I thought they would be a good for the grape vine to have something horizontal to grab onto as it grew up the side of the arbor. So Jen and I decided to put in three on each side. So we made a quick run to the local hardware store and got six 3/8" x 48" wooden dowels. I measured the inside distance between the two posts and cut them about 2 inches short of that length to the give the dowels about a one inch gap from the post on each side. Then I measured from the bottom of the top cross-brace to the top of the bottom cross-brace. I divided the length of the 2"x2" by four to get my measurement for the even spacing of the dowels. I marked the 2"x2" with pencil and drilled the holes in the 2"x2"s with my drill bit that's one size up from 3/8". I made a test hole in a scrap piece of wood with a 3/8" drill bit and I could not get the dowel through so that's why I went one size up and it fit snug. So after I got done drilling the holes (wishing I had a drill press so I could get the holes perfectly straight) in the 2"x2"s, I put the dowels through and then took the whole thing as one unit and attached it to the arbor one board at a time.

I first measured the distance between the two posts on the side, divided that value by 6, and then marked the cross-braces. Each mark in the center point for one vertical 2"x2". Jen helped me out by holding the boards while I screwed them into the cross-braces like so...


So here's the what it looks like after completing one side.
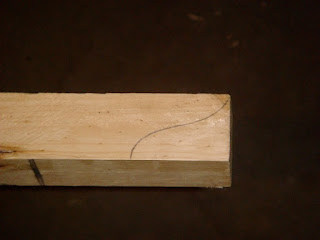
 So the final step in the arbor process was the 2"x2"s that go on the top. I placed a couple of them on to see if wanted to cut them down. We decided they looked fine at the full 8' length. After this, I thought we could cut the pattern in the top boards the same as we did for the two top beams. I tested it out on scrap board and it worked great. So we made the following marks on each board and cut them out with the jig saw.
 I thought this added a nice touch. I then marked the center of each of the 2"x2"s on the bottom side for centering when placed on the top of the arbor. I measured the center point on the top cross-brace on each side and ran a fishing line between the two top cross-braces. I lined up the center line on the bottom of the 2"x2"s with the fishing line. This centered the board on the top of the arbor.
 Now, I needed to mark the top beams so I could place the eight 2"x2"s evenly spaced apart. To do this, I measured the length of the top beam, divided the number by 9 (I'm using the number 9 because there are nine spaces between 8 boards and this will get the spacing even), and marked the top beams on both sides with the first mark being that distance in from the end of the beam. I placed the first beam on top of the arbor, centered it with the fishing line, lined the sides up with the mark on the beam on both sides and then screwed the 2"x2" in place.


It looks great! I especially like the gate.
ReplyDeleteSo, are you going to plant eating grapes, or wine making grapes?
ReplyDelete