31 July 2009

Monarch Way station update 2

This is what happens when sun and water get a hold of of a perennial garden.


For those of you who are new to this blog (I picked up some followers through Cold Antler Farm, I changed this section of my grass lawn to a flower garden in August of 2008. This will be it's first full year in growth.... and grown it has. All of the pictures can be clicked on to make them larger. To WILD gardening!

Earlier this year I posted about this garden here.

For the planting and extreme baby pictures of the butterfly garden those are here.

30 July 2009

Braids

I brought the garlic braids into the house and placed them into there final resting place. Hung from the celling they will stay there until the current braid is done, then we will bring one down to use.

Guarded by the "kitchen witch" together they'll keep the kitchen vampire free. *phew* I was worried for a while.

29 July 2009

No TV entertainment

Everyone asks us "What do you then?" when ever they learn we don't have a TV. Garden, walk, make elaborate dinners, and read are all possible answers.

Here's another.


What to do with a speed radar, a road bike, and a camera....

It's big time here at the Oxrieder farm.

Bead Lake Day Hike\ 30th Birthday

Sorry about the hiatus it was my birthday last weekend and we took some time off (sorta). Jake, Me and the munchkin all went for a hike. The big "30" went over smoothly!

Here are some highlights.


22 July 2009

Chickens, Roosters, and Babies oh my!

Well I sold Bee today. I had some snafu's with getting a buyer for her but now it's been taken care of. She is off to rule the roost at someone else's farm. Luckily they have a RIR rooster who will no doubly help Bee out with her need for motherhood. The transfer went smooth, however I felt bad because she was in the nest box, ready to lay an egg when we snatched her. I distracted the other 2 with a bowl of yogurt and the heist went off without a hitch. Hopefully the witless wonders won't even notice she's gone.

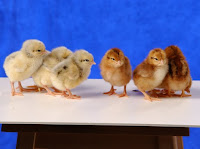
The babies are doing good, I noticed when they first arrived that one of them is distinctly more yellow than the other three. Red Star's are sexlink chickens which means they come out different colors. Males are yellow and females are a rusty brown. This yellowish one is bigger, with more developed wings. I think they might have sent me a rooster. Which sucks because they sent me a rooster last time. I ordered 4 chickens and ended up with 3. It seems like that might be happening again. But I must wait and see. The color difference isn't as drastic as this picture. However with the more developed wings it makes me think Roo.

Picture from here.

The plan was to sell WB and Bee and keep Curious and 4 new baby hens. So I would have 5 total. It looks like I might be keeping WB and Curious and 3 new baby hens.... who knows.

Here's some pictures and a quick video I took today of the girls(?) I tried to get angles of the giant wings the yellowish one has. But the color difference is very subtle.


21 July 2009

Heat wave


Heat wave. We are in for it now, solid 90* weather with no break in sight. Tomorrow we could reach into the 100* extremes. I hate this weather. For mainly that it keeps me inside during the day. We live in an area where all the trees were clear cut for the development of houses. Sadly all of my trees are at the baby stage. Maybe this weather wouldn't seem so bad if there was shade to be found. Alas.

Things I need to remember to do during this heat.

1. Fill the bird bath (sometimes twice per day) not only for birds but for bees as well.
2. Late evening watering of chicken run grass to cool the birds down.
3. Check and re-check all the plants and adjust water accordingly.
4. Hydrate myself.
5. Bake... at night... oh and it might be advisable to cook on the BBQ hmm...... what should I make for dinner?

Maybe I should buy another fan just incase one of mine goes bust?

20 July 2009

Project New Fence

We almost got the fence done yesterday but Jacob got called out. (The life of a phone guy) So we will finish the frame today. I do have a "so far" picture, but this was before we cemented, thus the beam supports are still in place.


Our reason behind the new fence, since we had one in place already is mainly for sturdiness. See, we ordered 2 grapes this year and intended to put them around the arbor. Well one of them wouldn't sprout so we thought it was dead, just incase though, I removed it from the ground and repotted it. In it's place we got another grape. Both of the "arbor" grapes are doing splendidly! But now this one in the pot has started to grow! After much thought and debate as to where to put the thing.... we opted to make our fence a bit sturdier. So we've cemented wooden posts instead of rebar. We'll then put the wire fencing back up and string the grape vine through it, should be fun!


I'll post more pictures of project new fence... as I take them...

19 July 2009

Cherry Jam With Pomona's Universal Pectin

We had a busy week thus far. Mostly along the lines of canning and dehydrating cherries. I made a cherry jam with the new Pomona's Universal Pectin. I must say I am very impressed with it. Here's the recipe:

Cherry Jam

10 c. Blended Cherries (not sure how much I started out with since I just grabbed and blended)
2 1/2 c. Sugar ( I only used this much to make it sweet and to help bring out the flavor that can be lost by canning)
6 tsp. Pectin
10 tsp. Calcium water (this activates the pectin and comes with the package)

Place blended cherries in a big pot, add the calcium water to the mix, heat it up to bubbling (just like any jam). In a separate bowl mix sugar and pectin. Once the cherries are boiling add the sugar/pectin mix it and return to boiling. Test the mixture for "set", I usually put a small dish in the freezer to cool the jam for an accurate test. Scoop off any foam on the top. Ladle jam into hot half pint jars, put the lids on and water bath process for 12 minutes. It made 13 half pints.

The jam is very firm, I am not that fond of cherry jam so I haven't tried it accept for the original test. But my family says it VERY good! I intend to do the same with raspberry jam later in the week. I haven't figured out the cost per jar of jam but I will do that, considering I only used 6 tsp of pectin and 2.5 cups of sugar.... in just supplies the cherry jam is cheaper than the strawberry.

The strawberry recipe is Here.

15 July 2009

New Chicks

After much debate about eggs vs cost of feed we've decided to get some more chicks and sell some of are other girls. Bee our hen who keeps going broody is our biggest eater. She goes broody about once per month and is insistent with it. Bee would be best kept with a rooster where she has the opportunity to hatch her own babies. When she goes broody, even though we 'break' her of it within 3 days, a switch is thrown in her body and she doesn't produce eggs for at least 1 week after she is broken of it. So 3 days of broody 7+ to get back in egg gear. Bee is eating that whole time and not producing eggs... she is eating more than she is giving. So I posted an ad for her on craigslist, desperately trying to find a farmer with a rooster for her. Once she hatches her own chicks, for the rest of the season she will continue to lay eggs. Making her worth her feed cost because she raised X number of babies for the future. I don't have that option, or am I looking for a 'breeding' flock.

Now WB or white back, has lately started laying better eggs but they are still only passable. The shell is still soft no matter how much oystershell and eggshell I set out or add to the food. She produces about 5 eggs per week. Pretty good all things considered, so we may keep her. If she can not get her egg shells in order she becomes dinner. Not for me but for someone who may raise meat birds for themselves. All of my girls have been raised organically so they can fetch a good value for there meat. Buff Orpington's are "dual" purpose birds meaning eggs and meat. The only one of my chicks that has consistently laid good eggs is Curious. We would keep her, the feed to egg ratio for her is excellent.

That brings me to our decision to get more chicks. This time we went with a breed called Red Star a "sex-link" breed meaning that the males and females hatch different colors, so you know who's who! They are a cross between a Rhode Island Red and/or several other birds depending on color. They have a mellow temperament, and lay up to 300 eggs per year (per bird). Buff Orpingtons by contrast lay between 160-200 eggs per year. So our feed to egg ratio is much better. A Red Star is not a heritage bird, they are a "hybrid" so I feel somewhat weird raising them. But, when we get our land we will choose a hardy heritage bird for a breeding flock.

Some pictures:

Adult Red Stars

picture from A Windy City Gal.

Our baby Red Stars

Ziplock Recycling


After we wash the bags we place them on the fridge by magnet to allow them to dry. Sexy isn't it?

14 July 2009

The Giant Rock


Post hole number one down.

9 to go.

P.S. This is why we brought in soil.... because one can't grow in rocks.

13 July 2009

Pretty Dragonfly


We saw this little guy hanging off our deck. Isn't it pretty?

07 July 2009

Friends

Hope.

Worm Bin Glop

Well our little red wiggler compost worms were looking mighty hungry. Plus we hadn't run them through the "water bath" in a while to get some of those yummy worm "castings" or worm poop. Hey... organic farmers put livestock poop in the garden, but I also use worm pooh!

So I scooped the worms and glop into some leftover screen, Filled a small rubbermaid tub with water and proceeded to do the soak and dip method of harvest. I filled the bucket 3 times and each time got a considerable amount of brown goo water. Which I dumped into a garbage can for storage, donated by my mother.


Poor worms were rather water logged by the end but that's ok because then they get a nice meal of strawberry tops, paper, coffee/tea grounds, and some veggie peels.


Looks like a feast!

06 July 2009

Strawberry Fruit Leather

What's with the recipes? Anyway a fruit leather recipe that is totally easy!

Strawberry Fruit Leather

1.5 lb. strawberries ( I kinda guessed on this.... I don't know maybe 5 cups)
3 TBL. Honey
Dash of fruit fresh to help it "keep" longer

Pick off greens and wash strawberries. Place in a pot, mash with potato masher until pulpy. Cook on medium heat until it reaches about 160* or slightly bubbling, (just before a rolling boil) this is to kill any germs. Add the honey and mix well. Place in a food processor or a blender until liquid.


Line 2 baking trays with plastic wrap. I have smaller 9 x 11 baking trays you may need to up the strawberries if you have giant ones. Pour an even mixture of the strawberry liquid onto the baking tray about 1/4 of an inch thick.


Place the trays in the dehydrator (plans coming I swear) or in the oven on low. Mine were done in about 7 hours, the temp out side was about 88* so the temp in the dehydrator was 120* or more. Remove from plastic wrap or roll the fruit into the plastic wrap and store.

A useful website about strawberry preserving.

05 July 2009

Dehydrator *action shot*

Look at that baby hard at work!

04 July 2009

Veggie Ciabatta


I made a truly yummy dinner and I just wanted to share the recipe for ya'll.

Veggie Panini

Ciabatta bread from the bread guys at the market
3 baby first squashes (about 5 inches big)
fresh green onions
fresh garlic (from the garden ;o)
tomatoes
fetta cheese
mixed spices ( rosemary, thyme, chives, oregano, onions)
Olive oil


Slice up the squash into strips or rings, whatever. Place in a dish to marinate with some olive oil and TONS of spices. Get really heavy handed with the spices since squash have little of there own flavor. Marinate for I don't know, 20 minutes *ish* Now place in a grill basket or on aluminum foil and grill on BBQ until tender and starting to slightly darken.

Cut ciabatta in half length wise, Place a BIG sprinkling of chives and onions (you can cook first if you prefer them softened) Lay the cooked squash on top sprinkle with fetta cheese, top with thinly sliced tomatoes and then add more fetta just because you can! Drizzle with the olive oil and spices left over from marinating the squash.

Place (carefully) your towering creation onto the BBQ on low! I placed this creation on the top shelf of the BBQ so it was further away from the flames. Close the lid and grill for like 10 minutes, the bottom should be crispy maybe slightly brown and the cheese melted.

Remove from BBQ cut into squares, give thanks to the farmers who grew and made this lovely thing for you, now ENJOY!

02 July 2009

What not to do when pick axing

What not hit when pick axing and removing rocks from the garden. Off to the store to repair the sprinkler tube!

First Garlic Harvest


It feels good to actually pull something out of the ground! We've been so damn busy and have nothing to bring inside to show for it. If we stand at the window though, we are reminded "oh yeah, that's why I hurt all over!"

Garlic was harvested Thursday June 25th in the evening. From what I read garlic doesn't like to be in direct sunlight so we ended up starting the harvest around 7 PM


This was our temporary solution before we devised the hanging system. Garlic needs lots of air flow in order to "cure" correctly. So, we placed them on screens while we figured out what the heck to do. We ended up bundling them in 8-10 making sure they had plenty of room around each bulb and hanging them with string on a wire rack set up on the front porch. (first picture)


I don't have the official tally since (honestly) I forgot. But they seem pretty good. For previous garlic posts about how we planted and what we grew click planting and spring tally.