
29 August 2009
25 August 2009
Raspberry Jam
 Well it is as promised a recipe for canning stuff. We did this about 2-3 weeks ago I know it's late but here goes. I made 2 different recipes because I have a brother who doesn't eat any processed sugar, so I had to attempt a wholly honey sweetened raspberry jam. Both were delicious! I do favor the sugar one only because honey tends to be a stronger flavor and there was a hint of it in the jam. Ok to the goods.....
bloggers note: For all my jams everything I add is either local or organic all of the fruit I have access to isn't organic accept the raspberries, so truly this is my only organic and local jam. Feels good.
Traditional Raspberry Jam (my way)
11 C. Mashed Raspberries ( I used a potato masher, rather nice for aggressions)
2 C. Honey (local please, don't by that shit from China even if it is cheeper)
1 C. Sugar
Pomona's Universal Pectin which allows for the drastic underuse of sugar to fruit ratio. This pectin is activated by the calcium rather than sugar like traditional recipes.
5 tsp. Calcium water comes with the pectin
5 tsp. Pectin
Heat mashed raspberries and calcium until bubbly. In a separate bowl mix pectin with sugar/honey this helps the pectin dissolve in the raspberries when you add it. Once it's bubbly add the pectin/sweets mix and re-bubbly it. Have your sterilized jars/lids/rings ready to go and the water bath boiling. To test if the jam is "set" to your liking I put a small dish in the freezer before I begin. After the jam has everything in it and is bubbling away, I take a spoonful and dump it on the freezer dish and put it back in the freezer for about 1 minute. This just brings the bubbly jam down to room temp quickly so you can see if you like how thick or runny it is. It was perfect so we moved onto the packing jars, lids, rings and get them in the water bath! We boiled ours for 12 minutes. Adding 1 minute for every 1,000 feet above sea level you are. I didn't write down how many 1/2 pints it made but I think it was around 12.

Jason's Raspberry Jam
This is the only honey recipe and it is a very small batch. It yielded 5 half pints.
4 C. Mashed Raspberries
1 3/4 C. Honey
2 tsp. Calcium
2 tsp. Pectin
Everything to process is the same as above, only I would have cheated and added about 3 Tbl. of sugar to help the pectin dissolve. It wouldn't blend with the honey and I ended up with pectin clumps that I had to squish. It slowed the process down considerably.
24 August 2009

23 August 2009
Surgery and Farm Update
I've been gone I know. I had surgery for a Hysterectomy on Tuesday. This has been a LONG time coming surgery with many alternatives attempted before the actual removal. Some people I am sure gasp at the idea of Hysterectomy at the age of 30. But I have had "issues" with the girl parts since "FOREVER". The thought of this 2 week, 1 time recovery, pain process is thrilling, compared to the once monthly week of incapacitation. For me the pain one week per month was worth this horrifying surgery. I don't come out of anesthetic well. Think roller-coaster dizziness/nausea. For having the abdomen cut into, looking forward to that outcome was not fun for me. But for the most part I am over the hump so to speak. It's been 5 days now and I have actually made it upstairs to the land of the living.
All my animals were sure I'd abandoned them. The cat and dog have since learned of my recovery, the chickens however are unsure that it's me. Since I can only wave and call to them from the basement door. Not allowed to go outside do to the dizziness factor. We have united the baby hens with Curious the one BO hen we have left. Our cover crops are coming up well and the potatoes seem to be doing better now that we've figured out the water system. The grapes have taken off now that they have something to climb. Raspberries are also taking off due to the figured out water system. All is well on this urban farm thanks to Mr. Sustainability who has been a champion this last week. I owe all my recovery and overall running of this operation to him. Thanks baby!
I'll try to get some posts out of the things I did before surgery, like raspberry jam..... but that will be later for now I need to lay back down.
12 August 2009
The Completed Garden fence

Which looks far better than rebar. Plus it will hold another grape plant.
Pesto
This year I wanted to make more pesto than I saved for last year. Mostly because I want to give it as gifts. Plus I under valued it's greens in winter potential and didn't make enough. I get the magazine organic gardening, they had a contest about pesto reciepes. Send in the reciepe and Maria at Maria's Farm Country Kitchen, will test them and decide a clear winner.
She devised that the secret to great green pesto is blanching the basil. Last year I didn't do this and my pesto did turn brown. It still tasted fine but I wanted it to stay perfect summer green. So this year I tried blanching it. Some leaves turned brown all though those may have been the ones I couldn't get out of the boiling water so fast. Regardless, it is a bright beautiful green. I packaged it in 1/3 cup and 1/2 cup sizes inside ziplock bags. I flattened the bags like I did with the veggie soup stock to save more room in the freezer. Now I have small very flat baggies of pesto for gifts and winter greens.
The Pesto Recipe
2 c. (packed) blanched basil
1/2. c. parmesan or favorite hard white cheese
1/2 c. olive oil
1/3 c. nuts (I used walnuts but pine, almond, cashews... whatever works you may toast them if you like)
3 medium garlic cloves (however hot you want them... some asian varieties get very spicy!)
dash of salt/pepper
dash of fruit fresh
I layered all ingredients in my food processor basil, everything else, basil. Then I processed it for about 1 minute. Scooped it out into level 1/3 or 1/2 bags then into the freezer. I decided this amount would be perfect for meal sizes. I didn't want to just freeze the whole thing and then chip off pesto from the large block when needed as some websites suggested. Voila!
I still have 3 basil plants in the garden 1-2 is for dried basil and the other is for pasta sauce when the tomatoes start rolling us over.
09 August 2009
Solar Dehydrator Project: Part 3 Finishing Up
Now that the cover is built and the main box is put together, it's time to put the wheels on and the 2 x 2 legs. Here are the drawings.

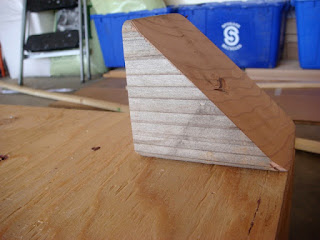
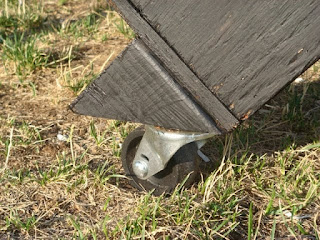
I cut a 4 x 4 at a 45 degree angle for the blocks that will be used to attach the wheels. This way, the surface that the wheel attaches to will be level when the whole box is at a 45 degree angle. I attached the the blocks to the main box by screwing through the main box from the inside of it. This wasn't easy but we managed after a few tries.
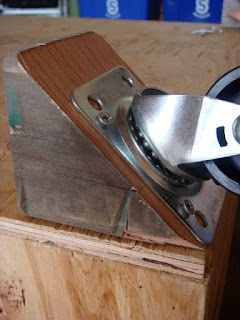
After the 2 blocks for the wheels were attached, we attached the wheels to the blocks. Since the provided holes in the wheels were to big for my drywall screws, I had to drill out smaller holes.

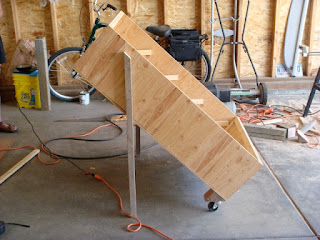
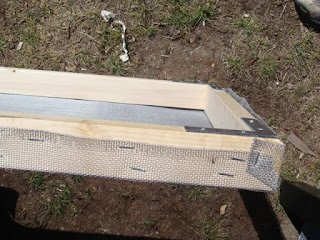
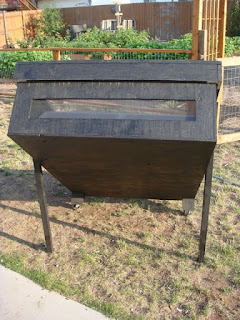
Now to attach the legs so the box will stand on it's own. There are a few variables here that will determine the length to cut the two legs. One is how deep the 1 x 2's were placed on the cover and the second is the size of the wheels that were put on. So this is what I did to figure out how long to cut the legs. First, I placed the cover on the box. The top of the leg has to be low enough as to not interfere with the cover. So with the cover on, I drew a line on the outside of the main box at the bottom of the cover. Then I took the cover off. Jen held the main box up at about a 45 degree angle. Putting the main box at a 45 degree angle makes the 1 x 2's that hold the trays on the inside of the box level. I put a level on one of the 1 x 2's used to hold the trays and Jen adjusted the main box until it was level. At this point, I took a 2 x 2, placed it against the box towards the top, leveled it vertically. Then I marked the 2 x 2 about 1 inch below the line that marks where the cover rests. Also, I drew a line where the 2 x 2 meets the main box (vertical) so I could put it back in the same spot after I cut it. I then cut two 2 x 2's exactly the same with the top of the 2 x 2 at a 45 degree angle. I then attached the 2 x 2 to the main box on one side. I measured out the placement of this board so I could attach the other board on the opposite side in the same position. Here is a picture.
After this was done, we painted the the main box and all the pieces for the cover. Now, we used a leftover black paint that we had used for another project so we wouldn't waste it. I admit it probably wasn't the best because it stunk pretty bad. I believe it was a Rustolium paint. Because of this, we let the box dry and air out really well. It just happened to be about 3-4 weeks before we needed to use it and by that time it didn't smell anymore. Looking back, I probably would have used an exterior latex paint or something like that. With a little research, you could probably come up with what's best to use.
So while the paint was drying, we moved onto building the four trays that hold the fruit. Here's the drawing for these.

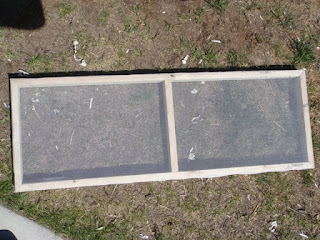
I made the mistake of only giving 1/8" of play on both sides of the tray. This was too snug of a fit for the tray when placing it into the dehydrator. Especially after putting the screen on. I'd strongly recommend making one tray, see if it works, and then making the final three. This saved me from having to redo all of them. I used the miter saw to cut all the pieces. We set the pieces together on a flat surface, nailed them together with the brad gun, and then put the corner braces in each corner to add strength. I predrilled the holes for the corner brace screws because I was worried about the wood splitting. I just used a drill bit that was smaller than the width of the actual screw so it would still thread into the wood. After this, Jen attached the metal screen.
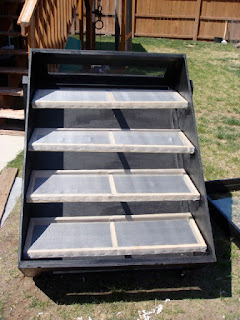
Now the trays were done.
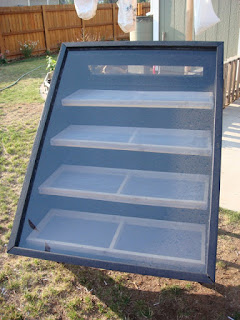
When everything that was painted was dry, we finished making the cover. We removed the protective plastic on the plexiglass, put it into the cover, and used the brad gun to attach the final cover boards that hold the plexiglass in. Also, we stapled the bug screen over the two ventilation holes on the inside of the main box.
Solar Dehydrator FINISHED!!!! YEAH!!!
Here are some final pictures and a video of the finished product with some final thoughts. Please feel free to ask questions!!!


I cut a 4 x 4 at a 45 degree angle for the blocks that will be used to attach the wheels. This way, the surface that the wheel attaches to will be level when the whole box is at a 45 degree angle. I attached the the blocks to the main box by screwing through the main box from the inside of it. This wasn't easy but we managed after a few tries.

After the 2 blocks for the wheels were attached, we attached the wheels to the blocks. Since the provided holes in the wheels were to big for my drywall screws, I had to drill out smaller holes.


Now to attach the legs so the box will stand on it's own. There are a few variables here that will determine the length to cut the two legs. One is how deep the 1 x 2's were placed on the cover and the second is the size of the wheels that were put on. So this is what I did to figure out how long to cut the legs. First, I placed the cover on the box. The top of the leg has to be low enough as to not interfere with the cover. So with the cover on, I drew a line on the outside of the main box at the bottom of the cover. Then I took the cover off. Jen held the main box up at about a 45 degree angle. Putting the main box at a 45 degree angle makes the 1 x 2's that hold the trays on the inside of the box level. I put a level on one of the 1 x 2's used to hold the trays and Jen adjusted the main box until it was level. At this point, I took a 2 x 2, placed it against the box towards the top, leveled it vertically. Then I marked the 2 x 2 about 1 inch below the line that marks where the cover rests. Also, I drew a line where the 2 x 2 meets the main box (vertical) so I could put it back in the same spot after I cut it. I then cut two 2 x 2's exactly the same with the top of the 2 x 2 at a 45 degree angle. I then attached the 2 x 2 to the main box on one side. I measured out the placement of this board so I could attach the other board on the opposite side in the same position. Here is a picture.

After this was done, we painted the the main box and all the pieces for the cover. Now, we used a leftover black paint that we had used for another project so we wouldn't waste it. I admit it probably wasn't the best because it stunk pretty bad. I believe it was a Rustolium paint. Because of this, we let the box dry and air out really well. It just happened to be about 3-4 weeks before we needed to use it and by that time it didn't smell anymore. Looking back, I probably would have used an exterior latex paint or something like that. With a little research, you could probably come up with what's best to use.
So while the paint was drying, we moved onto building the four trays that hold the fruit. Here's the drawing for these.

I made the mistake of only giving 1/8" of play on both sides of the tray. This was too snug of a fit for the tray when placing it into the dehydrator. Especially after putting the screen on. I'd strongly recommend making one tray, see if it works, and then making the final three. This saved me from having to redo all of them. I used the miter saw to cut all the pieces. We set the pieces together on a flat surface, nailed them together with the brad gun, and then put the corner braces in each corner to add strength. I predrilled the holes for the corner brace screws because I was worried about the wood splitting. I just used a drill bit that was smaller than the width of the actual screw so it would still thread into the wood. After this, Jen attached the metal screen.


Now the trays were done.
When everything that was painted was dry, we finished making the cover. We removed the protective plastic on the plexiglass, put it into the cover, and used the brad gun to attach the final cover boards that hold the plexiglass in. Also, we stapled the bug screen over the two ventilation holes on the inside of the main box.
Solar Dehydrator FINISHED!!!! YEAH!!!
Here are some final pictures and a video of the finished product with some final thoughts. Please feel free to ask questions!!!


Solar Dehydrator Project: Part 2 The Main Box
Now for building the main box of the dehydrator.
I will be posting a video of how we used the circular saw, a 1 x 4, and c-clamps to cut the plywood. It’s a bit difficult to explain in text. But we lent out our camera so it will be a few weeks before I can put that video together.
We started out with one 4’ x 8’ sheet of plywood that was 1/2” thick. Here’s the drawing of pieces we needed.


The 2 pieces of plywood that are going to be the top and bottom sides of the dehydrator need to have a hole cut in them for the ventilation. Here’s the drawing.


Next is to cut all the 1 x 2’s to reinforce the plywood box and to hold the food trays. Here’s are the drawings and some images of the boards cut and placed in their proper spots.


Now to put it all together!!! We used wood glue on all the seems and 1-1/4” brads. I’m so glad we have a friend that owns a brad gun!!! It made it so much easier. In this next video, you’ll see me adjust one of the boards by cutting it with a hand saw. This is because the board was a little too long.
Solar Dehydrator Project: Part 1 The Cover
Here we go!
In this first video, I explain why I started out making the cover first.
I started making the cover by cutting the 1x4’s to length according to the following drawing. The 1x4’s are cut to the length’s in the drawing for two reasons. First, this will give an 1/8” gap on all sides of the plexiglass so it can easily fit inside the frame of the cover. Second, it gives an 1/8” gap on all sides for the cover to easily fit over the main dehydrator box.

Next up is how we went about putting the frame together.
Hey brainiac, did you do that right?.....


Now for the 1x2’s that will hold up the plexiglass on the inside of cover frame.


Here’s is a side view drawing of the cover. Note: the gapping for the plexiglass doesn’t necessarily have to be 1/4”. Just make the gap slightly bigger than the thickness of the plexiglass. The plexiglass we used happened to be 1/8” thick and I gave it 1/8” of play. If your plexiglass is thicker, you’ll need to adjust this. I saw one person that used Lexan for a hinged door-like cover which was pretty nice but I didn’t want to put the effort or money into it. Lexan is much stronger than plexiglass but it’s expensive.

Here's the drawing for the final cover boards.

These last two videos finish up the cover.
Solar Dehydrator Project Intro

Last year Jen and I spent quite a bit of time going up to Green Bluff north of Spokane, WA and picking fruit. This was such a wonderful experience and gave us quite the appreciation for fruit picked ripe off the tree/plant. Nothing beats it! It gave us a great reference point for just how lame typical grocery store bought fruit/vegetables are. But, like some things in life, it comes with a bad side. Most of the fruit at Green Bluff is not organic. So we compromised. At this point in time and for this situation, we are putting local food above organic. It’s not organic but it didn’t have to travel hundreds if not thousands of miles to get to our home. We definitely would like the best of both worlds and we are continually on the lookout.
I do have to give props to one grower at Green Bluff, Vern and Nancy Fallstrom at Strawberry Hill Farm.
They do what they call nutritional farming. My understanding of it is that they are organic but not certified. That’s a drastically oversimplified explanation of it. If you want more information, I recommend talking to Vern. He’s a great guy with a wealth of information. Jen and I will keep going back to his place for as long as we can. His farm is definitely a farm we’ll try to model our garden after.
So back to the point. With all this great fruit on our hands, we looked at our options of preserving it which were canning, freezing, and drying. We went out and bought an electric food dryer. One of the round ones with all the plastic trays. Well, after using this thing, we realized that some of the wetter fruit took over a day to dry with this thing on constantly. UGH! Also, it tended to dry unevenly from the top to the bottom and it didn’t hold too much fruit. It would cost us from $1-2 per day to run in electricity. Not too bad but it was added cost.
So off to the land of information, Google. Heck, within about 10-15 minutes of the internet-space-time-continuum ( 2-3 hours realtime) we had a plan to build a Solar Dehydrator. Here’s the plans that I worked from Solar Fruit Dryer PDF.
I neatly tucked these plans in the back of my head in the engineering box and mulled them over during the winter months. Actually, I forgot all about it until Jen said in the spring, “Okay, we need to build the solar dehydrator.” Then my brain sprung into action and came up with a plan in a couple of days.
I modified the designs to fit our needs. Basically, instead of the dehydrator being 4’ x 4’, we made it 3’ x 4’. Also, I modified the lid to use plexiglass instead of plastic film and I put some wheels on it for ease of moving around. TRUST ME, you want to make the effort to put wheels on it. It’s quite simple and it makes WAY easier to move around. With wheels, one person can easily move it around to face the sun throughout the day. Without wheels, you’d need two people to move it and that would get annoying.
Jen and I are all about sustainable living. Thus the name of this blog. But that is only the first part. More importantly than living sustainably ourselves, we try to encourage everyone to do the same and give them freely the information they need to do so. Leading by example is our goal. Therefore, we constantly try to document everything we do so others can do it also.
We didn’t do a great job of documentation when we built our chicken coop (which will be posted soon). So this solar dehydrator is our first good venture into a complete project.
A few things about the project. The measured drawings are done by me. Amateur! I’m not a CAD expert. Though, I’m pretty proud of my results for a first try. Last time I did any CAD drawings was back in college about 9 years ago. I have no idea how much the whole project cost us but I’d be willing to be it was under $100. I had to get VERY creative with the tools I used. I don’t have much in the way of fancy tools ( I’m crossing my fingers hoping that will change over the next few years ). The main tools I used were a brad gun (borrowed), circular saw, c-clamps (borrowed), tape measure, pencil, drill, miter saw, and my brain (sometimes this one malfunctioned).
Please feel free to ask questions or point out mistakes. But most importantly, BE SAFE and wear protective gear especially Safety Glasses!!!!!
07 August 2009
Mason Bee Block Update
Well they've been up for several months now. Many bee's have laid and covered babies for next year. We'll definately have to add more of this size. So far the giant 3/8" (thumb sized) has no bee's in it. All the other sizes do, the most active being the 5/16" size.
All of the images are clickable for a closer look.


All of the images are clickable for a closer look.


02 August 2009
New baby Meet and Greet
 It went well I think. WB our low ranking adult orpington chicken feels the most threatened by the babies. Which I knew would happen. She ruffles up her feathers and tries to look huge, then she chases them around the yard. Curious our other adult girl, cares little for them. She will peck at them and put them in there rightful place but otherwise takes no notice of them. Yellow the baby (whom we think could be a roo?) had no fear of the big girls and felt free to charge and poke. It's gonna get real interesting around here.
Subscribe to:
Posts (Atom)