Just another reminder post that the blogs URL or web address will be redirected on Friday. The new website is www.raintogreen.com
I'll be rerouting the oxrayfarm traffic over to the new website, on Friday. OxrayFarm blog will remain on the web but the address will now be www.oxrayfarm.blogspot.com
Thanks guys!
05 December 2012
03 December 2012
It's time to move
Followers,
It's time to move. Well not in that way... geez I just posted about the house, we haven't sold it yet. No, I'm talking about the blog is going to move. I stopped blogging for a while because I really hated bloggers layout and how much I struggled just to get a cohesive post. Trying to upload video is difficult, I can never get it to look quite right.
I switched to a tumblr powered blog, and have been blogging there for over 3 months and loving it. I've come back occasionally and posted duplicate posts on both tumblr and blogger. I didn't want to leave anyone behind. But I am going to switch permanently. I did consider keeping oxrayfarm and trying to blog on two platforms, but lets be honest, this blog would fall by the wayside.
I wanted to let any followers know before hand. I didn't want to shock anyone. Here's the plan:
1. Let ya'll know about the move.
2. When the move is going to be official. ( Friday December, 7th 2012)
3. New Website name: www.raintogreen.com (which is live already)
4. Redirect traffic. On Friday I'll be changing oxrayfarm's web address to point to raintogreen. What that means is, when you type in oxrayfarm.com you will be automatically redirected to raintogreen.com.
I plan on leaving this blog on the web it won't disappear. But the address will change to www.oxrayfarm.blogspot.com. If you follow me in blogger dashboard, I'm not sure what will happen. It maybe that you'll have to "follow" a whole new blog with a different address, that being the raintogreen.com address. All of the old blog posts will remain on the web for reference for at least a year or two, then I'll integrate any older posts I want, and take this one down.
Sorry to freak everyone out, but I just found that I couldn't tolerate the little things that made posting on blogger so frustrating and time consuming.
I'll post again here on Wednesday as a reminder. Please come with and follow me at www.raintogreen.com
Jennifer
30 November 2012
The Big Decision

Jake and I decided a few weeks ago that we are going to put our mini farm up for sale. The decision was a long one, we've been considering it from every angle but it's time. The one thing all topics like this boil down to is money. We can afford to live here, but we can't afford to live here and retire early. Myself being a full time domestic engineer (house/farm girl) I'm, I guess what you'd call retired. I don't bring in any income unless you count food and meat as income. Jake is the full time 9-5 er that keeps the bills paid and the roof over our head.
But our goals changed, because we've been given a heads up about layoffs that most people never receive. Jake's company has growing in size over the last 3 years by acquiring 2 other companies. With such growth come the inevitable lay offs. Jake was almost picked last spring but the current Boss fought to keep his position. We found all this out after the fact and it's been weighing on us, do we wait for the inevitable or take action?
Over the winter I'll be getting the house ready for sale. Doing things like cleaning, selling things on eBay, and dealing with different livestock issues that arise. I am sure this will be the first of many posts about the farm for sale.
24 November 2012
Thanksgiving Desert Pictures
I forgot to take pictures on our T-day, which was Friday for us. So this is the next morning damage. Pie and Champagne.


22 November 2012
Gluten Free or Whole Wheat Stuffing

Directions:
1 loaf of bread cubed, dried
1 stick of butter (1/2 cup melted)
1.5 Cups onion finely chopped
1.5 Cups celery finely chopped
1 quart (or less) chicken/rabbit or vegetable stock
1/4 - 1/2 tsp.salt
Start with 1/2 tsp. of the following, then add to taste.
pepper
sage
poultry seasoning
Combine all of the ingredients in a large bowl, set in a cool place for 2-3 hours to allow the flavors to incorporate and the bread to soak up the stock and butter. After 2-3 hours check moisture level and add more stock accordingly, the stuffing should be like a soggy sponge but not dripping. Let sit another hour after adding more stock and seasonings. Check again, adjust stock and seasonings. Bake 320* oven for 2-2.5 hours uncovered. Stirring every 30 minutes. Taste along the way.
I uploaded a video walking through the steps so ya'll can see it visually.
Cheers and Happy Thanksgiving!!
20 November 2012
Frogs in the Garden

I photographed a rather large frog (for around here) in mid October, hiding in the worm bin. But this guy was right outside the back door, truth be told I almost stepped on him. I had him in my hand but he jumped onto the sleeve of my jacket and proceeded to nestle in for the long haul. I considered for a moment doing my morning farm chores with a ride along guest, but ruled it out on the grounds if he slipped I might step on him.
Cute little guy huh?


16 November 2012
Winter Growing Vegetables
The video has most of the information in it. But I took a few pictures that I'd like to share too.

Swiss Chard and root veggies in the back. Showing the agribon and the hoop frame bones below.


Here are the links to the agribon and the tufflite 6 mil plastic that I use. I really like the agribon fabric, it serves for late season extender and also getting going earlier in the spring.

Swiss Chard and root veggies in the back. Showing the agribon and the hoop frame bones below.


Here are the links to the agribon and the tufflite 6 mil plastic that I use. I really like the agribon fabric, it serves for late season extender and also getting going earlier in the spring.
16 July 2012
Mini GreenHouse Milk Jug Update
Way back in March I talked about winter sowing veggies in milk jugs. Well here is the much awaited update about that.
I have mixed reviews depending on the plant. I started in milk jugs; tomatoes, cabbage family (broccoli, cauliflower, bak choi etc..) lettuces, spinage, swiss chard. There were flowers too, zinnia, nasturium, cosmos and marigolds. What survived? Well the swiss chard, spinage, and lettuce was a smash!! Although, now that I have a cloche set up this will go by the wayside and I'll plant the seeds directly into the ground in early spring.
The flowers did well too, I got all the zinnias, cosmos and marigolds started early and set into the ground. However, Jack Frost came out of late retirement and screwed me over as usual! Anyone who knows Jake and I know we watch the weather obsessively, our projected low was 39*. I woke up to a frost, hard enough that the all the neighbors roofs were still covered. I hate that! Opening the curtains to welcome the day and receiving a poop pie in the face... guess what?!?! all your plants you didn't cover are toast!!! Ok back to the facts. I lost nearly all the marigolds, and zinnias but my mom who had not planted her's yet, survived the frost and she gave me some. They have done well so far and are now about double what a normal "planted after last frost" plant would look like.
The cabbage family was a bust. I am not sure if it was weather, or if they didn't like there roots disturbed or the ants that attacked the roots and made the whole thing wither and die. We also got a strange heat wave in early May, the temps soared to upper 80's which caused the bok choi to bolt. Regardless, Neighbor Kara gave me a head of cauliflower since our crop was toast. Her's did just fine, but was store purchased and planted much later than mine was. I've had very little success with the cabbage family in this garden.
The tomatoes did so freaking awesome!! WOOT!! Most of the tomatoes in my garden are the ones I grew inside the "traditional" way that I've been growing tomatoes for years. Traditional way: starts inside, pick the best ones, re-pot into 4" pots, harden off in May, get into the ground. Milk Jug way: prep milk jug, dirt, seed, water, set outside... wait.... plant!! The 3 tomatoes that are milk jug grown are just as big as the traditional grown. When we got the late frost, all the other tomatoes had frost burned leaves and looked a little sad. The milk jug tomatoes looked great, they had been coping with cold temps there whole life! The milk jug kids are not the same size plant when they go into the ground, they are maybe the size of my fist or smaller. The traditional grown ones are about as big as a small basketball (not in thickness but height). When I planted the milk jug tomatoes they looked so sad and tiny, I was sure they'd never amount to much. It's nice to be wrong about that. The two varieties that I chose to plant are Black Krim, and Currant. Two varieties I got from Neighbor Kara's sister. Both these tomatoes are newbee's here. Looking back I should have transplanted something I've grown before so I could have a comparison as to which method is better. But I think I'll still get that regardless of tomato type.
I don't have a tiny in the ground picture. But the comparison is similar to the tomatoes in this picture vs. the peppers. The milk jug tomatoes were about the size of the peppers when I put them into the ground.

And now they look like this. Waist height and the same size as everyone else! Now it's just a matter of time to see how they perform as far as fruit production. But I will likely next year have tons of milk jugs again! Can you tell who's who? The last 3 cages are the milk jug kids, everyone else is the traditional method.

03 July 2012
The chicken situation
I was worried a few months ago about what would happen when Shinny went broody, how would Curious react. Would she go around "bawgawking" waiting for someone to answer her? As it turns out she didn't do anything bad, she was her calm quiet self, she kept Shinny company during the day. I never did get a picture of it, but Curious would roost as close to the nest box as she could and hang out with her broody friend. It was really very sweet. Shinny went broody for the entire month of May and about 2 weeks ago she started again.
I have a farmer friend who has a rather large flock of chickens, I called him up and explained my situation. He suggested we bring Shinny to his house so that she can run with a rooster and have the chance to hatch some babies. We agreed to trade, so I went outside and grabbed Shinny off the nest box and put her into a basket and drove over to my farmers house. I set my broody chicken onto a nest box and she seemed rather dazed, I can only imagine it was quite the shock. Broody hens always have this dazed look about them though. I digress... I picked out 2 chickens and paid for one of them.
The black/orange small kid is a Campine chicken or a Hamburg we're not sure. She has her wing clipped because she is a good flyer. I think they are more of an ornamental chicken, however she has laid the last two days, we'll see if she lays today. They are decent sized white eggs. The black/grey girl is a easter egger (EE) mutt. She has some of the characteristics of an EE like the beard but she doesn't have a rose comb. So I'm not sure what she is. Her eggs are a decent size and a soft brown/pink in color.
So far they are both extremely quiet, neither one has "sang" after they lay, which is awesome. Curious seems to be coping well, she tries to bully them but since they were with a large flock and a rooster the new girls are used to dodging attacks. Both of them are very shy and not at all apt to let me handle them, which is ok. Hopefully the Campine chicken will not become an escape artist. Only time will tell.
01 July 2012


01 June 2012
Farm Update
It's been a while, we've been busy with garden and family visits. Finally I am able to get some stuff out there!
I'll start with the bee's, we decided after our spring tests came back to split the 'snow' hive. We moved the empty 'dots' hive out to the friends property and got set up for the split. We took from 'snow' 4 frames of baby bees in varying stages from egg, to capped brood and one of honey/brood mixture. First we made sure that the 'snow' queen was not on any of these frames we took (that's important or you have serious bee drama on your hands). Once the frames were moved over into the 'dots' hive we closed 'dots' up and locked them in for 24 hours. They can't fly and so can't get back to the original queen. By leaving them locked in for 24 hours the bees loose the sent of the original queen and will be likely to accept a new one. I contacted our Master Beekeeper and got a queen from him. We installed her 12 hours after the original lock up. Came back 12 hours later and freed the bees, making sure to put tons of weeds/grass/branches in front of the hive to make the forager bees reorient to the new hive. Jake also faced the hives in apposing directions, to further make sure the foragers would get back to the right hive. Happy to say they did accept her and have been working strong for the last 3 weeks. We should have a huge population boom in the next week or so!

Next on my giant list of things to do was pick stinging nettles. I missed my opportunity last year and by the time I remembered the nettles were well into flower. This year mom and I went out with a giant green tub and filled it with nettles! Mom will probably be horrified that I put a picture up of her rain-fuzzed-out hair! LOL!
I brought all the nettles home and divided them into 3 categories, blanched, dried or compost tea. I used the best of the leaves for blanching and freezing, dried the really good stalks for me and the bunnies. Then made the rest into compost tea.
The last is a video I made for the YouTube followers, livestock update mostly about the bunnies.
I'll start with the bee's, we decided after our spring tests came back to split the 'snow' hive. We moved the empty 'dots' hive out to the friends property and got set up for the split. We took from 'snow' 4 frames of baby bees in varying stages from egg, to capped brood and one of honey/brood mixture. First we made sure that the 'snow' queen was not on any of these frames we took (that's important or you have serious bee drama on your hands). Once the frames were moved over into the 'dots' hive we closed 'dots' up and locked them in for 24 hours. They can't fly and so can't get back to the original queen. By leaving them locked in for 24 hours the bees loose the sent of the original queen and will be likely to accept a new one. I contacted our Master Beekeeper and got a queen from him. We installed her 12 hours after the original lock up. Came back 12 hours later and freed the bees, making sure to put tons of weeds/grass/branches in front of the hive to make the forager bees reorient to the new hive. Jake also faced the hives in apposing directions, to further make sure the foragers would get back to the right hive. Happy to say they did accept her and have been working strong for the last 3 weeks. We should have a huge population boom in the next week or so!

Next on my giant list of things to do was pick stinging nettles. I missed my opportunity last year and by the time I remembered the nettles were well into flower. This year mom and I went out with a giant green tub and filled it with nettles! Mom will probably be horrified that I put a picture up of her rain-fuzzed-out hair! LOL!
 |  |
The last is a video I made for the YouTube followers, livestock update mostly about the bunnies.
10 May 2012

08 May 2012
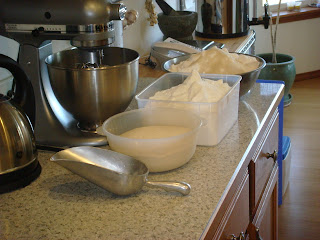
Time to harden-off plants again.
I started on Sunday taking everyone outside and putting them in the shade all day. They slowly get sun exposure over the next 2 weeks before I plop them in the ground. The spring dance, where no kitchen table space can be found!


27 April 2012
Giant Spring Bee Update
This is the first year we've been able to pull bees through the winter. It's very exciting considering we thought for sure our Stripes hive would be dead. Our plan has always been to have the bees tested twice per year, early spring and early fall. This gives us time to treat them or figure out what's wrong and change it. Our master beekeeper Jim Miller over at Millers Homestead has a lab that can test all sorts of stuff from varoa and trachea mites to the PH level in the bees body. Just take him a sample of 100 bees and he can figure out if you should treat them or not. I've never gotten a picture of what a sample of bees looks like but picture this: scooping/brushing/dumping, a mass of bees from a hive frame into a wide mouth mason jar and getting a lid on is fun. 1 inch deep = 100 bees roughly. The mason jar doesn't have to be full of bees that would be thousands! But I am a bit occupied while trying to collect a sample to take a picture. Then in order to kill them as quickly as possible I run inside and put the jar in the freezer. It sounds heartless I know, and honestly we don't enjoy bee sample collection day, but it's for the good of the hive.
Here's what Jim found out about Snow hive, I haven't received the results from Stripes yet.
100 frozen bees from snow hive 4/14/12
Weight 14.4g/100 bees or 0.14g/bee – good weight
Varroa mites – none found
Tracheal mites – none found
Nosema spores – none found
pH – 6.02 – a little high, looking for about 5.5 pH.
Deformed bodies – none found
Color of thorax muscles – light pink
Sample looks good. Suggest checking pH late June.
Awesome huh!? We decided to give them a spring tonic for lack of a better term its made up of various essential oils mixed into a sugar syrup. Here's the recipe:
To make 5 gallons of "medicine"
25lbs Granulated Sugar (we used a mixture of drivert sugar and organic granulated)
3 Gallons of water
Mix these together to form a thick syrup. To this add the essential oils below.
1/2 tsp. Thyme
1 tsp. Lemon Grass
1 tsp. Peppermint
1 tsp. Sweet Orange
3 parts polysorbate (this helps the oil mix with the sugar water, it's an emulsifier)

I didn't have a container big enough to make 5 gallons of syrup, so I had to split the recipe in half and then mix both parts into a 5 gallon bucket. But we got it done in the end.
 We made this and fed to to both hives to boost there health. Since we don't usually do sugar syrup feeding we did the plastic bag method. Fill a gallon ziplock about 1/2-3/4 full and make sure it's sealed!! Then lay it across the hive's frames and using a box cutter or sharp blade, cut some slits in it so the syrup will pool in the top. For a great visual of this check out this beesource link. The syrup smelled lovely. This weekend we will be going and refilling the bags until the mixture is gone. Which should take about 3 weeks for 2 hives to drink 5 gallons of syrup medicine.
 Last year when we got our bees they came in a nuc or a small already started hive with 5 frames each. The nuc however contained plastic frames and plasticell which is a rigid frame that has the honeycomb shape stamped into it, it forces the bees to draw comb in a predefined shape. To see the nuc and the top of the plasticell frame check out our post from last year called Apiary Expansion. Since we beekeep naturally we wanted that plastic crap out of our hive! Bees will move up over the winter and huddle in the top box, leaving the bottom box mostly empty. Last year we made sure to keep the plasticell frames in the lower box, ensuring they would be empty this spring. So we pulled them out and replaced them with empties to be filled with natural wax that the bees control the size of.
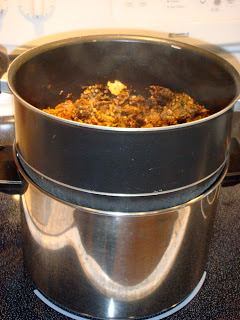
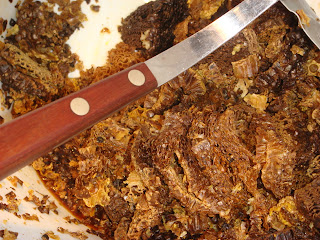
 But I didn't want the wax on those frames to go to waste, so I scraped it into a big bucket, then melted and filtered it in order to get beautiful golden wax. It looks like something awful though, but it smells like wax and honey so melting it down wasn't as bad as it sounded. I put the wax in a double boiler at first but then changed my mind. I ended up putting the gunk in my wax metal mesh filter over a pot with a slight amount of water in it and sticking it in the oven at 210* the wax slowly melted into pot below, the water kept it from sticking and burning in the pot and the filter kept all the bee parts and such from the wax.
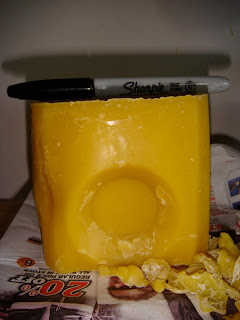
Then I poured the water/wax mixture into a milk jug with a knee high pantyhose over the top, thus catching anything and filtering the wax further.
I ended up with a beautiful block of wax complete with milk jug indents. LOL! Not all of this wax was from the frame scraping. I had some wax flakes leftover from our first year of beekeeping that needed to be melted also.
I'll have to perfect my wax melting program since we beekeep naturally we'll end up with more wax then most beekeepers.
Here's what Jim found out about Snow hive, I haven't received the results from Stripes yet.
100 frozen bees from snow hive 4/14/12
Weight 14.4g/100 bees or 0.14g/bee – good weight
Varroa mites – none found
Tracheal mites – none found
Nosema spores – none found
pH – 6.02 – a little high, looking for about 5.5 pH.
Deformed bodies – none found
Color of thorax muscles – light pink
Sample looks good. Suggest checking pH late June.
Awesome huh!? We decided to give them a spring tonic for lack of a better term its made up of various essential oils mixed into a sugar syrup. Here's the recipe:
To make 5 gallons of "medicine"
25lbs Granulated Sugar (we used a mixture of drivert sugar and organic granulated)
3 Gallons of water
Mix these together to form a thick syrup. To this add the essential oils below.
1/2 tsp. Thyme
1 tsp. Lemon Grass
1 tsp. Peppermint
1 tsp. Sweet Orange
3 parts polysorbate (this helps the oil mix with the sugar water, it's an emulsifier)

I didn't have a container big enough to make 5 gallons of syrup, so I had to split the recipe in half and then mix both parts into a 5 gallon bucket. But we got it done in the end.
 We made this and fed to to both hives to boost there health. Since we don't usually do sugar syrup feeding we did the plastic bag method. Fill a gallon ziplock about 1/2-3/4 full and make sure it's sealed!! Then lay it across the hive's frames and using a box cutter or sharp blade, cut some slits in it so the syrup will pool in the top. For a great visual of this check out this beesource link. The syrup smelled lovely. This weekend we will be going and refilling the bags until the mixture is gone. Which should take about 3 weeks for 2 hives to drink 5 gallons of syrup medicine.
 Last year when we got our bees they came in a nuc or a small already started hive with 5 frames each. The nuc however contained plastic frames and plasticell which is a rigid frame that has the honeycomb shape stamped into it, it forces the bees to draw comb in a predefined shape. To see the nuc and the top of the plasticell frame check out our post from last year called Apiary Expansion. Since we beekeep naturally we wanted that plastic crap out of our hive! Bees will move up over the winter and huddle in the top box, leaving the bottom box mostly empty. Last year we made sure to keep the plasticell frames in the lower box, ensuring they would be empty this spring. So we pulled them out and replaced them with empties to be filled with natural wax that the bees control the size of.
 But I didn't want the wax on those frames to go to waste, so I scraped it into a big bucket, then melted and filtered it in order to get beautiful golden wax. It looks like something awful though, but it smells like wax and honey so melting it down wasn't as bad as it sounded. I put the wax in a double boiler at first but then changed my mind. I ended up putting the gunk in my wax metal mesh filter over a pot with a slight amount of water in it and sticking it in the oven at 210* the wax slowly melted into pot below, the water kept it from sticking and burning in the pot and the filter kept all the bee parts and such from the wax.
Then I poured the water/wax mixture into a milk jug with a knee high pantyhose over the top, thus catching anything and filtering the wax further.
I ended up with a beautiful block of wax complete with milk jug indents. LOL! Not all of this wax was from the frame scraping. I had some wax flakes leftover from our first year of beekeeping that needed to be melted also.
I'll have to perfect my wax melting program since we beekeep naturally we'll end up with more wax then most beekeepers.
19 April 2012
Chicken Reduction Program
When it comes to chickens we either have ones that won't lay and go broody, or ones that are so loud they are practically roosters. Neither one works for us in our current location. About 2 weeks ago I had put the babies out in the coop and Curious proceeded to have a chicken tantrum for well over a week. More babies were to follow since we'd planned to raise way more than we needed and keep the ones that seemed calm and quiet. But the noise level got to be too much to handle around here. I've been buying eggs from our local country market since October when all the sussex chickens went on strike. All the other breeds we've tried picked up egg laying after a molt but the sussex's didn't.
Since we purchase our eggs well over half the year it got me thinking about why we have chickens in the first place. I am starting to think that anything less then 10-15 birds is a waste of money. Jake and I talked it over and decided to get out of the chicken business. Not forever, just while we are here. The problem is Curious, since she has the freezer pass she is the one who makes a big stink about the new baby chickens. She's not mean to them, but she gripes about them constantly dawn --> dusk! If we didn't have her, we would have no problem culling old hens and rearing new ones. So for now we just have the two adult birds. I put an ad on craigslist and sold all the babies within 3 hours! Both adults, Curious and Shiny have a freezer pass, it might be temporary though. Shiny will inevitably go broody, and leave Curious all alone for 1 month so we are not sure how that's gonna go. I just don't want to butcher Curious, she's too sweet, I don't have any sentimental attachment to any other farm creatures but.... we'll see she may force my hand when Shiny goes broody.
Since we purchase our eggs well over half the year it got me thinking about why we have chickens in the first place. I am starting to think that anything less then 10-15 birds is a waste of money. Jake and I talked it over and decided to get out of the chicken business. Not forever, just while we are here. The problem is Curious, since she has the freezer pass she is the one who makes a big stink about the new baby chickens. She's not mean to them, but she gripes about them constantly dawn --> dusk! If we didn't have her, we would have no problem culling old hens and rearing new ones. So for now we just have the two adult birds. I put an ad on craigslist and sold all the babies within 3 hours! Both adults, Curious and Shiny have a freezer pass, it might be temporary though. Shiny will inevitably go broody, and leave Curious all alone for 1 month so we are not sure how that's gonna go. I just don't want to butcher Curious, she's too sweet, I don't have any sentimental attachment to any other farm creatures but.... we'll see she may force my hand when Shiny goes broody.
18 April 2012
Garden Layout Redux Finished
Before: Sort of, I don't have a good aerial picture of the garden in its hey day.

After: The dirt mounds, here come the weeds! Ugh!


Garlic Beds I made last fall when we didn't have the design laid out. They are roughly 6 feet wide instead of the 4 foot we would like all the beds to be. So In the last picture you can see how the path way just stops right at the garlic bed, we'll be continuing that path once the garlic is all pulled in July. We will also be filling in the garlic path ways that run horizontal to all the vertical paths, making the garden uniform. I needed little paths because I'll have to weed and water the garlic partially by hand since the drip lines are placed where the permanent bed shape will be so about 2 feet of the garlic I'll have to water by hand. If that makes any sense....


29 March 2012
Greenhouse Milk Jugs and Seedlings
 I ran across a blog about using milk jugs as mini greenhouse's and winter sowing. The website is called WinterSown.org. After paroozing the information I decided to give it a go. Most of these milk jugs were started the first week of March which around here is still very cold. I know you can start mid winter or whenever you get the hankering for hands in dirt.
 I even started things like tomatoes that have no business being outside before late May. Some things have already started popping up. The early spring reliable's like cabbages, kale, spinage, swiss chard, you know the cold weather guys.
I've even started different flowers that I would like to get a head start on like marigolds, nasturtiums, and zinnia.


This will be my first year attempting the wintersown method. I didn't want this to be my only source for veggies, so I've also done the inside under grow lights method. Since it's warm in there they are understandably way ahead of anything in the milk jugs.
Tomatoes!

Peppers!

We'll see how the milk jugs pan out. The advantage being the plant is already hardened off. So the inside outside, in the sun, in the shade dance that I do every spring would be eliminated. That would be cool!
Subscribe to:
Posts (Atom)