Jen and I are going to move to comment moderation now. So if you comment on any of are post and they don't show up, just be patient until we approve them. Since we don't get many comments, this shouldn't be a problem. When we get up to a million follows, we'll go back. LOL. : )
We received 5 comments on our old blog that contained links in some foreign language. I'm 100% sure the links are to spam/porn. I've deleted them but unfortunately, you can't report anyone for doing this (correct me if I'm wrong). They only way to avoid this kind of stuff is to moderate your comments. So, we've chosen to moderate comments for now. I'd feel terrible if someone got a virus or directed to bad sites through our blog, even if it was by accident.
So please use computer sense if you see this on other blogs. If in doubt, DON'T CLICK!!!
26 February 2010
24 February 2010
Updates on Life without a microwave
So the whole microwave revelation started with pizza and although warmed up pizza in an oven is glorious, it's nothing to compared to pie. See mom made us cherry tarts (from last years frozen cherries thank you) for good ole' George Washington's B-day. I can't remember why to bake a cherry pie but regardless, cherry tarts ensued. So last night I turned on the oven to 350* placed the tart in the center and set the timer for 20 minutes. When the timer buzzed out came the tart all beautiful and full of itself, smelling like loveliness. We dished up our frozen yogurt, split the tart in half and set to work on enjoyment. The crust got me first all flakey and wonderful nothing like the soggy resemblance of crust in a microwaved slice of pie. Evenly heated every bite was warm, no hot spots. It was one of the few stand out meals that is so exponentially better than it's microwaved counter part I can't even put it into words. Try it, it's brilliant.
Other meals are sometimes easier or harder depending on frozen ingredients and if I had any forethought. It's been a month now since the removal, most of that time was made of pre cooked meals I had on hand for my surgery which got postponed. So the forethought on meal planning was minimal. Take it out frozen stick in oven, cook, eat. Now with most of those meals gone planning for thawing ingredients will be a challenge. I am not looking forward to using the oven when it's like 100* outside this summer. But we are planning on building a solar oven to assist with that. Or we'll just live off food we cook on the BBQ. Further updates on the microwave situation as we progress through this year.
Other meals are sometimes easier or harder depending on frozen ingredients and if I had any forethought. It's been a month now since the removal, most of that time was made of pre cooked meals I had on hand for my surgery which got postponed. So the forethought on meal planning was minimal. Take it out frozen stick in oven, cook, eat. Now with most of those meals gone planning for thawing ingredients will be a challenge. I am not looking forward to using the oven when it's like 100* outside this summer. But we are planning on building a solar oven to assist with that. Or we'll just live off food we cook on the BBQ. Further updates on the microwave situation as we progress through this year.
23 February 2010
Junk mail

Privacyrights.org
DMAchoice.org
41pounds.org
I called DirectTV to (with any luck) get off there mailing lists, since we don't own a TV it seems pointless to keep shredding the paper. At DMA choice I removed myself from all magazines, catalogs, and other random mailings. I however called about the credit card opt out at 888-567-8688, It's through opt-out-preescreen which can be accessed through DMA's website. With any luck I will stop receiving credit card applications from Skank of America.
Seriously I would love it if I could check my mail only once per week maybe get just the bills from the crapy guys who need to actually mail a bill every month. (thank you city of cheney) My occasional Organic Gardening magazine is the one joy I have when I get the mail.
Picture and another useful article from stopjunkmail.
22 February 2010
Vinegar
In an effort to reduce the amount of plastic that crosses the threshold of this house I think I want to make vinegar. I use that for everything! It just seems such a waste to keep buying it in evermore plastic. But I don't want to make the yummy kind like ACV, or white wine, anything that essentially gets used in cooking. I have found a few recipes and I think I am going to mix them and give em` a go. I have had major success in kombucha brewing, which is a form of vinegar. I think if I can get something really acidic it can be used in a similar fashion as the store bought white vinegar. We'll see, after all I am not going for edible, just for cleaning and laundry the bulk of my vinegar use. I'll post back with some kombucha pictures and the recipe for the vinegar.
Girlyman
These guys satisfy the inner choir geek in me. I just found them from another blog I follow. Enjoy fellow 3 part harmony dorks!
19 February 2010
Toothpaste
Sorry I've been slacking on the blogging and it's not for lack of topics either. Mostly I've been researching flooring, chicken coops, water footprints and humanure. All over the place. I recently came across a blog titled fake plastic fish, Beth, the author of the the blog has been on a remove plastic journey. And that lead me to the great pacific ocean gyre.
I do promise to write about all the things I have been researching but for now I want to document my toothpaste recipe. In and effort to live lighter on the planet and reduce even more our output of garbage I thought homemade toothpaste would be a good idea. There are TONS of recipes online all of which are great but this is what we decided to do.
almost 1/4 c. baking soda
almost 1/4 c. coconut oil
4+ drops of peppermint essential oil (more or less as needed)
about 1.5 Tablespoons of honey
1.5 teaspoons hydrogen peroxide
Mix well.
 I mixed all this and put it in an old yeast jar. It is much runnier at first but it thickens up to a crumbly paste. We tried it at first with less coconut oil but the baking soda was way too abrasive. Still, I don't brush directly on my teeth right at first. I add a tiny amount (1tsp or less) of water in my mouth add my toothpaste and swish a little. Just to start the baking soda dissolving. Then I brush with the runny toothpaste. Jake and I switched to an earth friendly brand a while ago so we are used to the lack of foamy toothpaste. But for some it might come as a shock. Like the lack of bubbles in dishwater, without detergents and foaming stuff.
Coupled with our EcoDenT floss, we intend to go green with our toothbrushes too. Preserve has the gimme 5 program that recycles #5 plastics into household stuff. They make toothbrushes that can be purchased new, and sent back to be re-made into a new toothbrush when you're done with the old.
I do promise to write about all the things I have been researching but for now I want to document my toothpaste recipe. In and effort to live lighter on the planet and reduce even more our output of garbage I thought homemade toothpaste would be a good idea. There are TONS of recipes online all of which are great but this is what we decided to do.
almost 1/4 c. baking soda
almost 1/4 c. coconut oil
4+ drops of peppermint essential oil (more or less as needed)
about 1.5 Tablespoons of honey
1.5 teaspoons hydrogen peroxide
Mix well.

Coupled with our EcoDenT floss, we intend to go green with our toothbrushes too. Preserve has the gimme 5 program that recycles #5 plastics into household stuff. They make toothbrushes that can be purchased new, and sent back to be re-made into a new toothbrush when you're done with the old.
16 February 2010
TED- Jamie Oliver on the food system
Not a shocker for me because we are locavores and eat real unprocessed food. This is definitely worth a watch, but make time for it because it's 20 minutes long.
Toxic floss?

Image from here.
15 February 2010
Plastic Reduction
Jacob and I have been striving to reduce even further our plastic waste. We have a long way to go but I think I am in love with this woman! She has some fantastic ideas!
Butter Making In Pictures
I started with 2 pints of heavy whipping cream, placed them in the mixer on medium high.
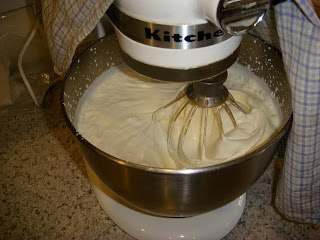
Now it looks like whip cream, keep mixing.

It starts to get thicker and take on a weird soft yellow color.

This is just before the "buttermilk" breaks out of the butter. It looks kinda granular and the yellow is more pronounced.
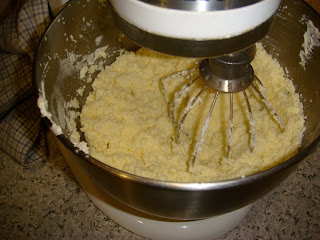
An then it happens, the mixer and all contents sound sloshy and "buttermilk" is flying out everywhere.
Pour this off and use it like milk. It's not real buttermilk because that is cultured.

Now that the butter milk is poured off, I mix again just to get even more to break free. Once I think I've gotten all that I am going to I switch to my paddle mixer. Then add a cup or more of cold water. Use this to 'wash' the butter. No the butter isn't going to dissolve into the water. Ever plop play dough or crisco in water? Oil/water don't mix. This washing with cold water removes any extra butter milk that may be lingering. This will spoil your butter, make sure to get it out.

Keep dumping and refilling your mixer with new cold water until the water runs clean like in this picture. Now you have butter. It won't keep as long as store bought butter since it isn't filled with preservatives. Freeze it. I salted only one "stick" of it and then made the rest plain. I figure I can salt it on an as needed basis.

This is the 4 sticks of butter I ended up with after 2 pints of cream. I did one more pint after this for a total of 1.25 pounds of finished butter. Cost wise it's probably not worth it. But I end up with the buttermilk that most people don't factor into the 'is it worth it' cost estimate. For just the butter, no for butter and butter milk.... maybe. Still, I like that this doesn't require one time use only packaging. I get my cream from a bottle that gets reused by Straus family creamery. They aren't local, but our local dairy say's there milk is just pasteurized but I can't make cheese with it, which means they lie and it's really ultrapasteurized (UP). UP milk is dead, everything that makes it milk has been killed off by the heat of cooking it. It's white water, don't buy it. So I get my milk from out of my region because it's good quality milk and they package it in reusable containers. And now I'll get off my soap box.....
Butter making is pretty easy and it's lots of fun too!

12 February 2010
Plop bread
This is actually a no knead bread recipe that is so easy it's kinda sad. It just takes time.... over night actually. I am not going to type out the long post about how to make it because the website my mom found it at has way better pictures and information.
But seriously doesn't this look yummy? It was in fact! It's really good oil/vinegar dipping bread or garlic bread with pasta, or crunchy peanut butter toast.... you get the idea.
The recipe is at steamy kitchen.

But seriously doesn't this look yummy? It was in fact! It's really good oil/vinegar dipping bread or garlic bread with pasta, or crunchy peanut butter toast.... you get the idea.
The recipe is at steamy kitchen.

09 February 2010
Crochet Hook Case Completed
I finished this like 2 weeks ago but never got around to actually posting the picture. I posted about crocheting a hook case for my various sized hooks and a few knitting needles. Here it is complete. I don't think I would do this project again, mostly because of the wool used to felt the outside was kinda pricey. I think I would just look up a tutorial online and sew one. I am much more comfortable with my sewing machine than I am with knitting/crochet.
But that's beside the point. :o)

But that's beside the point. :o)

08 February 2010
Beekeeping Hive type
We've been doing a lot of research lately on the type of bee hive we want to start. The Langstroth hives, big white boxes that most people are familiar with when you think "bee hive" are on the expensive side to start up. With boxes, supers for honey, frames and possibly frame foundation (guides for bees to build on) the price tag for us to start 2 hives was getting into the $700 range, not including the bees!
I searched the Warre` hives, they look similar to a Lang hive accept the bees build there own comb. No frames or foundation. Some truly beautiful hive material, however they get heavy. For the Lang method if you need more room (generally speaking) a new hive box is added on top. But I guess that's now really how bees work, they like to work from the top down. This is how the Warre hives work, when you need a new box for more bee room it gets added to the bottom. A lot of heavy lifting to get the boxes on top moved or a special lift must be built. Nope..... not gonna happen.
We've settled on Top Bar Hives or TBH. There's two types Kenyan and Tanzanian. One box is "V" shaped the other is square. Other than that they are very similar. The idea is a box that runs horizontally not vertically like the previous two hives I mentioned. We will be easily able to make our hives by hand, rather than having someone craft them for us. By doing our beekeeping this way and building the hives ourselves we can get into the hobby for well under $400. That is a very high number, assuming we use VERY high quality wood, purchased new. If we can scrounge up some pallets we might be able to make it for even cheeper! We'll see.
Here's a link to a beautiful top bar hive and bees.
04 February 2010
Cloth wipes for #1

I am surprised how easy it really is. I keep the clean pads in a beautiful cloth cube my mother in law sewed for me right on the counter by the toilet. The dirties go in a small wicker basket I got at the aforementioned thrift sore for a whopping .69 cents.

Not including the time it took me to sew the pads my cost as been miniscule. Adding maybe $1 for the thread used I am up to $4.69, ok maybe $5 after tax. Now considering I have barely used 1/2 of the original queen sized sheet, I am going to get a lot of life out of that original $3 purchase. I am not sure how much TP I will save but I can already tell it's going to be tons. Since I purchase the 100% recycled TP the cost can get pretty high. Not that I would suggest this as a money saver but it will probably save me around $200 per year in TP costs.
Now about #2..... maybe later.
03 February 2010
Soap Making, first attempts

The process I did was called cold process soap. What I plan to do next with this soap is hand mill it. Basically, I shred the soap add water and essential oils, herbs, colors (not likely), and re-mould it. This makes for a firmer bar of soap that doesn't just disintegrate in water. I can do this process after the soap has cured for at least 1 week.
I followed the soap recipe from down---to---earth, I changed the rice bran oil to safflower oil because I couldn't find the rice bran oil. Other than that it was pretty easy, scary but cool. I plan to make spiffier soaps but for now just a basic soap mix sounds good to me!
02 February 2010
No Shampoo
I've been trying out this "no-poo" or no shampoo method for about 2 months now. The decision to try this method stems from lots of purchased shampoo and major scalp upsets because of it. I would get MAJOR dandruff, itchy scalp, frizzy hair etc.... I started buying shampoo in the bulk section of our green grocer so I could get smaller samples of them. Trying to go green and use only earth friendly shampoos started to become and issue with my scalp.
After doing some research I stumbled upon the "no-poo" method. Using only baking soda and apple cider vinegar. I did that for about 1 month. Same dandruff issues, no itchy scalp, but extremely fuzzy hair. The baking soda was too much for my already dry hair. For the last month I've been using a weekly apple cider vinegar/water mix, 2 tsp ACV/4 cups water and a once every two weeks dosage of 50/50 white vinegar/water mix. Usually 1 cup of each. This is curbing the dandruff issues. Not sure why but the acid in the vinegar seems to be doing wonders for my scalp.
But, I am getting into the stages where most people quit and go back to shampoo. My hair feels really greasy from my scalp to about 3 inches down. This is because my scalp is over reacting, detoxing if you will. See our hair is supposed to have an oil coating. Not slimy, greasy, oily but an oil coating on our hair. When I use shampoo all of that oil is stripped away, and our bodies ever in search of balance over produce that oil until it realizes that it doesn't have to any more. Since I can't use the baking soda without the dandruff disaster I have to wait it out. But it's not all bad. I take a comb to my hair (difficult with all these curls) and brush the oils down and away from my scalp. Then I hop in the shower and do my 50/50 vinegar rinse and it's much better. I've noticed my curls are tighter, less fuzzy. The only thing I use as a "styling" product is coconut oil for the last 6" of my hair. This is the dry, brittle part that needs some extra help.
Some people use a conditioner without silicones in them. Silicones bind to your hair and need shampoo to remove them. Using the conditioner as a "shampoo" in a similar vinegar mixture of 50/50 conditioner/water. I am considering this... but only half heartedly. I really don't want the extra chemicals in the conditioner.
The cost of the "no-poo" method is much cheeper than conventional shampoos. Plus I like how my shower isn't lined with plastic bottles of randomness any more.
In other greening news, we've given up use of q-tips having done research that they aren't really good for you anyway. We'll keep them around for random cleaning of small things. But no longer are putting them in our ears daily. Also I am going to try making our own toothpaste and soap. I attempted the soap but it was a failure I am in the process of trying to save the ingredients.... we'll see.
Subscribe to:
Posts (Atom)