
10 May 2012
08 May 2012
Time to harden-off plants again.
I started on Sunday taking everyone outside and putting them in the shade all day. They slowly get sun exposure over the next 2 weeks before I plop them in the ground. The spring dance, where no kitchen table space can be found!


27 April 2012
Giant Spring Bee Update
This is the first year we've been able to pull bees through the winter. It's very exciting considering we thought for sure our Stripes hive would be dead. Our plan has always been to have the bees tested twice per year, early spring and early fall. This gives us time to treat them or figure out what's wrong and change it. Our master beekeeper Jim Miller over at Millers Homestead has a lab that can test all sorts of stuff from varoa and trachea mites to the PH level in the bees body. Just take him a sample of 100 bees and he can figure out if you should treat them or not. I've never gotten a picture of what a sample of bees looks like but picture this: scooping/brushing/dumping, a mass of bees from a hive frame into a wide mouth mason jar and getting a lid on is fun. 1 inch deep = 100 bees roughly. The mason jar doesn't have to be full of bees that would be thousands! But I am a bit occupied while trying to collect a sample to take a picture. Then in order to kill them as quickly as possible I run inside and put the jar in the freezer. It sounds heartless I know, and honestly we don't enjoy bee sample collection day, but it's for the good of the hive.
Here's what Jim found out about Snow hive, I haven't received the results from Stripes yet.
100 frozen bees from snow hive 4/14/12
Weight 14.4g/100 bees or 0.14g/bee – good weight
Varroa mites – none found
Tracheal mites – none found
Nosema spores – none found
pH – 6.02 – a little high, looking for about 5.5 pH.
Deformed bodies – none found
Color of thorax muscles – light pink
Sample looks good. Suggest checking pH late June.
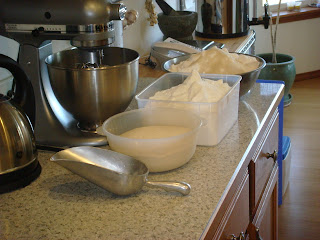
Awesome huh!? We decided to give them a spring tonic for lack of a better term its made up of various essential oils mixed into a sugar syrup. Here's the recipe:
To make 5 gallons of "medicine"
25lbs Granulated Sugar (we used a mixture of drivert sugar and organic granulated)
3 Gallons of water
Mix these together to form a thick syrup. To this add the essential oils below.
1/2 tsp. Thyme
1 tsp. Lemon Grass
1 tsp. Peppermint
1 tsp. Sweet Orange
3 parts polysorbate (this helps the oil mix with the sugar water, it's an emulsifier)

I didn't have a container big enough to make 5 gallons of syrup, so I had to split the recipe in half and then mix both parts into a 5 gallon bucket. But we got it done in the end.
 We made this and fed to to both hives to boost there health. Since we don't usually do sugar syrup feeding we did the plastic bag method. Fill a gallon ziplock about 1/2-3/4 full and make sure it's sealed!! Then lay it across the hive's frames and using a box cutter or sharp blade, cut some slits in it so the syrup will pool in the top. For a great visual of this check out this beesource link. The syrup smelled lovely. This weekend we will be going and refilling the bags until the mixture is gone. Which should take about 3 weeks for 2 hives to drink 5 gallons of syrup medicine.
 Last year when we got our bees they came in a nuc or a small already started hive with 5 frames each. The nuc however contained plastic frames and plasticell which is a rigid frame that has the honeycomb shape stamped into it, it forces the bees to draw comb in a predefined shape. To see the nuc and the top of the plasticell frame check out our post from last year called Apiary Expansion. Since we beekeep naturally we wanted that plastic crap out of our hive! Bees will move up over the winter and huddle in the top box, leaving the bottom box mostly empty. Last year we made sure to keep the plasticell frames in the lower box, ensuring they would be empty this spring. So we pulled them out and replaced them with empties to be filled with natural wax that the bees control the size of.
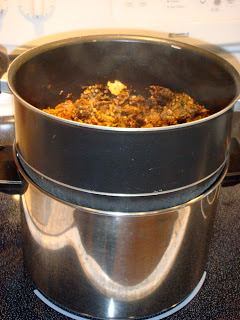
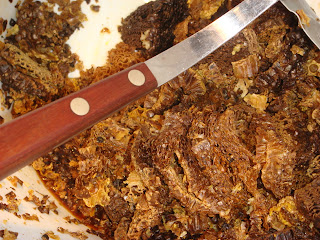
 But I didn't want the wax on those frames to go to waste, so I scraped it into a big bucket, then melted and filtered it in order to get beautiful golden wax. It looks like something awful though, but it smells like wax and honey so melting it down wasn't as bad as it sounded. I put the wax in a double boiler at first but then changed my mind. I ended up putting the gunk in my wax metal mesh filter over a pot with a slight amount of water in it and sticking it in the oven at 210* the wax slowly melted into pot below, the water kept it from sticking and burning in the pot and the filter kept all the bee parts and such from the wax.
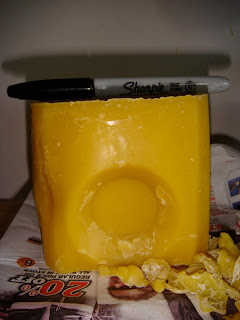
Then I poured the water/wax mixture into a milk jug with a knee high pantyhose over the top, thus catching anything and filtering the wax further.
I ended up with a beautiful block of wax complete with milk jug indents. LOL! Not all of this wax was from the frame scraping. I had some wax flakes leftover from our first year of beekeeping that needed to be melted also.
I'll have to perfect my wax melting program since we beekeep naturally we'll end up with more wax then most beekeepers.
Here's what Jim found out about Snow hive, I haven't received the results from Stripes yet.
100 frozen bees from snow hive 4/14/12
Weight 14.4g/100 bees or 0.14g/bee – good weight
Varroa mites – none found
Tracheal mites – none found
Nosema spores – none found
pH – 6.02 – a little high, looking for about 5.5 pH.
Deformed bodies – none found
Color of thorax muscles – light pink
Sample looks good. Suggest checking pH late June.
Awesome huh!? We decided to give them a spring tonic for lack of a better term its made up of various essential oils mixed into a sugar syrup. Here's the recipe:
To make 5 gallons of "medicine"
25lbs Granulated Sugar (we used a mixture of drivert sugar and organic granulated)
3 Gallons of water
Mix these together to form a thick syrup. To this add the essential oils below.
1/2 tsp. Thyme
1 tsp. Lemon Grass
1 tsp. Peppermint
1 tsp. Sweet Orange
3 parts polysorbate (this helps the oil mix with the sugar water, it's an emulsifier)

I didn't have a container big enough to make 5 gallons of syrup, so I had to split the recipe in half and then mix both parts into a 5 gallon bucket. But we got it done in the end.
 We made this and fed to to both hives to boost there health. Since we don't usually do sugar syrup feeding we did the plastic bag method. Fill a gallon ziplock about 1/2-3/4 full and make sure it's sealed!! Then lay it across the hive's frames and using a box cutter or sharp blade, cut some slits in it so the syrup will pool in the top. For a great visual of this check out this beesource link. The syrup smelled lovely. This weekend we will be going and refilling the bags until the mixture is gone. Which should take about 3 weeks for 2 hives to drink 5 gallons of syrup medicine.
 Last year when we got our bees they came in a nuc or a small already started hive with 5 frames each. The nuc however contained plastic frames and plasticell which is a rigid frame that has the honeycomb shape stamped into it, it forces the bees to draw comb in a predefined shape. To see the nuc and the top of the plasticell frame check out our post from last year called Apiary Expansion. Since we beekeep naturally we wanted that plastic crap out of our hive! Bees will move up over the winter and huddle in the top box, leaving the bottom box mostly empty. Last year we made sure to keep the plasticell frames in the lower box, ensuring they would be empty this spring. So we pulled them out and replaced them with empties to be filled with natural wax that the bees control the size of.
 But I didn't want the wax on those frames to go to waste, so I scraped it into a big bucket, then melted and filtered it in order to get beautiful golden wax. It looks like something awful though, but it smells like wax and honey so melting it down wasn't as bad as it sounded. I put the wax in a double boiler at first but then changed my mind. I ended up putting the gunk in my wax metal mesh filter over a pot with a slight amount of water in it and sticking it in the oven at 210* the wax slowly melted into pot below, the water kept it from sticking and burning in the pot and the filter kept all the bee parts and such from the wax.
Then I poured the water/wax mixture into a milk jug with a knee high pantyhose over the top, thus catching anything and filtering the wax further.
I ended up with a beautiful block of wax complete with milk jug indents. LOL! Not all of this wax was from the frame scraping. I had some wax flakes leftover from our first year of beekeeping that needed to be melted also.
I'll have to perfect my wax melting program since we beekeep naturally we'll end up with more wax then most beekeepers.
19 April 2012
Chicken Reduction Program
When it comes to chickens we either have ones that won't lay and go broody, or ones that are so loud they are practically roosters. Neither one works for us in our current location. About 2 weeks ago I had put the babies out in the coop and Curious proceeded to have a chicken tantrum for well over a week. More babies were to follow since we'd planned to raise way more than we needed and keep the ones that seemed calm and quiet. But the noise level got to be too much to handle around here. I've been buying eggs from our local country market since October when all the sussex chickens went on strike. All the other breeds we've tried picked up egg laying after a molt but the sussex's didn't.
Since we purchase our eggs well over half the year it got me thinking about why we have chickens in the first place. I am starting to think that anything less then 10-15 birds is a waste of money. Jake and I talked it over and decided to get out of the chicken business. Not forever, just while we are here. The problem is Curious, since she has the freezer pass she is the one who makes a big stink about the new baby chickens. She's not mean to them, but she gripes about them constantly dawn --> dusk! If we didn't have her, we would have no problem culling old hens and rearing new ones. So for now we just have the two adult birds. I put an ad on craigslist and sold all the babies within 3 hours! Both adults, Curious and Shiny have a freezer pass, it might be temporary though. Shiny will inevitably go broody, and leave Curious all alone for 1 month so we are not sure how that's gonna go. I just don't want to butcher Curious, she's too sweet, I don't have any sentimental attachment to any other farm creatures but.... we'll see she may force my hand when Shiny goes broody.
Since we purchase our eggs well over half the year it got me thinking about why we have chickens in the first place. I am starting to think that anything less then 10-15 birds is a waste of money. Jake and I talked it over and decided to get out of the chicken business. Not forever, just while we are here. The problem is Curious, since she has the freezer pass she is the one who makes a big stink about the new baby chickens. She's not mean to them, but she gripes about them constantly dawn --> dusk! If we didn't have her, we would have no problem culling old hens and rearing new ones. So for now we just have the two adult birds. I put an ad on craigslist and sold all the babies within 3 hours! Both adults, Curious and Shiny have a freezer pass, it might be temporary though. Shiny will inevitably go broody, and leave Curious all alone for 1 month so we are not sure how that's gonna go. I just don't want to butcher Curious, she's too sweet, I don't have any sentimental attachment to any other farm creatures but.... we'll see she may force my hand when Shiny goes broody.
18 April 2012
Garden Layout Redux Finished
Before: Sort of, I don't have a good aerial picture of the garden in its hey day.

After: The dirt mounds, here come the weeds! Ugh!


Garlic Beds I made last fall when we didn't have the design laid out. They are roughly 6 feet wide instead of the 4 foot we would like all the beds to be. So In the last picture you can see how the path way just stops right at the garlic bed, we'll be continuing that path once the garlic is all pulled in July. We will also be filling in the garlic path ways that run horizontal to all the vertical paths, making the garden uniform. I needed little paths because I'll have to weed and water the garlic partially by hand since the drip lines are placed where the permanent bed shape will be so about 2 feet of the garlic I'll have to water by hand. If that makes any sense....


29 March 2012
Greenhouse Milk Jugs and Seedlings
 I ran across a blog about using milk jugs as mini greenhouse's and winter sowing. The website is called WinterSown.org. After paroozing the information I decided to give it a go. Most of these milk jugs were started the first week of March which around here is still very cold. I know you can start mid winter or whenever you get the hankering for hands in dirt.
 I even started things like tomatoes that have no business being outside before late May. Some things have already started popping up. The early spring reliable's like cabbages, kale, spinage, swiss chard, you know the cold weather guys.
I've even started different flowers that I would like to get a head start on like marigolds, nasturtiums, and zinnia.


This will be my first year attempting the wintersown method. I didn't want this to be my only source for veggies, so I've also done the inside under grow lights method. Since it's warm in there they are understandably way ahead of anything in the milk jugs.
Tomatoes!

Peppers!

We'll see how the milk jugs pan out. The advantage being the plant is already hardened off. So the inside outside, in the sun, in the shade dance that I do every spring would be eliminated. That would be cool!
28 March 2012
Rabbit Update
I made a video for the youTube followers who keep up with me there. Most of them don't know about how I feed my rabbits a natural diet and don't use pellets. I made just a general update about them and posted it. I link it here too so everyone can see the bunz.
26 March 2012
March 26th Homestead Update
We had nice weather this weekend and much outside work was done. Our to-be espalier trees are all in the ground, they are 2 year old trees which isn't ideal for for espalier but such is the way of gardening most of the time. I also planted the 4 red current bushes I intend to cordon on our east side yard that is sun/shade mix, but currents can be understory plants so I'm not worried about the lack of sun. I was also given by my neighbor a branch of black currents, and told to propagate them by sticking whips of them in the ground, leaving about a foot above and 6" below ground. With luck a few of them will root out and I'll have some black current bushes.

I put the first round of baby chickens outside in the rabbit tractor for the first time on Sunday. They were pretty freaked out, the world is a lot bigger than the broody box as it turns out. I snapped a rare picture of all three out in the sun, most of the time they stayed in the back huddled together for safety. I let the two remaining adults chickens loose in the garden to "help" me spread the manure around.


Once I got the ground rototilled, Jake helped me stake out the new garden bed locations. Then I worked away at shoveling the walkway soil into the garden bed area. It's amazing how much soil is in the garden bed area. We had so much pathway in our garden layout before that the growing beds seem really tall. Which is good because it'll give the roots deeper growing space. I know the soil will compact with the rain but it seems huge right now.


Jacob meanwhile was working on finishing up our woodshed and transferring the wood into it's permanent home. We had built a makeshift wood pile and covered it with a tarp, since we got the wood and stove in December it was too late to actually build something. The shed is a pretty simple lean-to using two sides of the fence as walls and only covering one side with plywood. This leaves the east side open for access, since our prevailing wind/rain come from the southwest the wood should stay nice and dry.
Before:

After: Without one plywood wall.

Since the woodshed is over in the "bee hive" corner, Jacob got a video of the girls flying. The Stripes hive we were sure would die had so little bee's going into winter, they are still weak but getting stronger as spring progresses. It's hard to see on the video but they are bringing in orange and pale yellow almost white pollen, likely from dandelions and crocus plants.
21 March 2012
And then there were two.... sort of

The babies in the brooder box inside are getting nice and big, about the size of a small Flicker or a big Robin. It's still too soon for them to go outside as they aren't fully feathered. If it were warmer outside and the nights didn't dip below freezing they would be fine to be outside.

It's official, one of our babies is a rooster. Ugh! Which is fine really we'll just raise him until he starts crowing. Since one of our replacement layer birds has the audacity to be male, I opted to start more chicks and then take the best personalities for egg layers and the rest will go to Camp Freezer. The rooster is the black one speckled with white. Since they are sexlinked chickens the color does matter. Males tend to be grey/white/black, and females black/red.

Yesterday I went to our farm store and got 6 babies. 3 Wyandottes (the black and white ones) and 3 Red Star Sexlinks (the egg yolk ones). Coupled with the original brood box of 2 Black Sexlinks and 1 Buff Orpington, we seem to be over run with babies! It's all good though, I appreciate the meat they'll give us in the end, plus it saves me from breeding the rabbits as intensively.
06 March 2012
The Bee's
We managed (so far) to bring both hives through winter. The hive out on a friends property the "Snow hive" is Kicking Ass!! They are strong in number coming into spring which means likely they will swarm. But that could be a good thing because we'd split the hive and then have 3 separate hives. WOOT! The only downside to the Snow hive, they might have Nosema which is like bee dysentery. It can weaken them and eventually kill them. We won't know for sure until they can be tested, and in order to test the hive we have to take a sample, but to take a sample the hive has to be opened and we can't do that until the temperatures are above 60*. But they seem strong, strong enough anyway to last until the temps warm up. The brown streaks are.... what you're thinking. As soon as we have them tested we'll treat with a combination of essential oils.
This is Jake scraping out the dead bees that collect on the bottom of the hive. The girls take care of this in the summer time when they are able to fly. In the winter the dead just pile in the bottom, blocking air flow and thus disease can reign.

The hive at our house is doing good too. We thought for sure they would die off due to such small numbers. But yesterday in the warm sun tons of bee's were flying, so they look promising. I still think we'll have to combine them with another hive just to give them a chance at long term survival. But we'll see. With any luck we'll get honey this year.
05 March 2012
Progress of garden redux
Over the last few weeks we've been tearing down the wood, removing the watering system and raking up the mulch in the walkways. Now that the ground is starting to thaw we'll be able (provided we don't get a ton of rain) to rototill the ground and re-shape the raised beds. This is tricky, if we use the rototiller to soon the wet mud will make the ground very compact later in the season. But we can't wait too long because I'll need to plant things quickly. I just might have a late start this season, but the soil health must come first since that's the foundation of everything.
The watering system is low priority since watering by hand won't be an issue until late May. But with any luck we won't need it until June provided we actually get spring rains... who knows anymore?
Anyway here are some destruction pictures:

The watering system is low priority since watering by hand won't be an issue until late May. But with any luck we won't need it until June provided we actually get spring rains... who knows anymore?
Anyway here are some destruction pictures:
 |  |
 |  |

02 March 2012
well crap...
When I went to pick out the chicks I selected the sex-linked Black Star pullet/girl box. They should be all black, well one of them is developing a white crown on the head. It's a roo...
UGH!
UGH!
28 February 2012
Drop Manager
My Azure Standard drop managers asked me to take a drop point. Tim & Laura who manage our AS drop are taking care of a friend with cancer, the bi-monthly AS order has become a bit too much for them, so I agreed to handle one of the routes. We have two routes that come through town, the I-1 and I-2 routes. We have what's called an open drop where anyone in the area can order and have it delivered to a drop point (me or Tim & Laura) then they come and collect there stuff. It's a nice way to save on gas so the truck driver doesn't deliver to everyone's house it all just goes to your drop manager. A closed drop would be you and several of your friends only, as long as you make the minimum $500 order. It's riskier with an open drop because you might not make that $500 but this way everyone gets a chance to play. In our area we are one of AS's biggest drop routes. The goods for tomorrow's drop are in the $800 area, but usually they are nearing $1,600. That's a lot of buying power!
Tomorrow during a snowstorm will be my first ever drop. The truck driver will show up, hand me a stack of invoices and start unloading the truck. I'll run inside and start calling everyone to let them know the truck and goods have arrived. Then they'll show up and collect stuff, viola done!
It's pretty straight forward and according to Tim & Laura everyone is pretty good about coming to get stuff. I'm looking forward too it, maybe I'll post some pictures tomorrow?
Subscribe to:
Posts (Atom)